07: User Authentication with React Starter Kit
Chapter 07: User Authentication with React Starter Kit
Section titled “Chapter 07: User Authentication with React Starter Kit”Overview
Section titled “Overview”Authentication is the foundation of any multi-user application. This chapter implements a complete authentication system using Laravel’s official React starter kit, which provides React 19, TypeScript, Inertia.js, Tailwind CSS 4, and shadcn/ui components out of the box.
The React starter kit uses Inertia.js to bridge Laravel’s backend with a React frontend, creating a modern single-page application (SPA) experience without the complexity of a separate API. You get server-side routing with client-side navigation-the best of both worlds.
By the end of this chapter, users will be able to register, log in, verify their email, and reset forgotten passwords. You’ll understand how Inertia works, how Laravel Fortify handles authentication behind the scenes, and how to customize the authentication views to match your CRM’s design.
This chapter transforms your CRM from an open application to a secure, multi-user system.
Prerequisites
Section titled “Prerequisites”Before starting this chapter, you should have:
- ✓ Completed Chapter 06 or equivalent database schema
- ✓ Laravel 12 project (
crm-app) with Sail configured (from Chapter 02) - ✓ Sail containers (PHP, MySQL, Redis, Mailhog) running and accessible
- ✓ Node.js 18+ and npm installed
- ✓ Text editor with project open (VS Code, PhpStorm, etc.)
- ✓ Terminal access with basic command-line familiarity
- Basic React knowledge helpful but not required
Estimated Time: ~90 minutes
Verify your setup:
Before proceeding, ensure your crm-app project is ready:
# Verify you're in the crm-app directorypwd  # Should end with: /path/to/crm-app
# Verify Sail containers are running (from Chapter 02)sail ps
# You should see:# laravel.test          Up# mysql                 Up# redis                 Up# mailhog               Up
# If containers aren't running:sail up -d
Quick Start
Section titled “Quick Start”Want to see where this chapter takes you? Here’s the end state:
# After completing all steps, you'll have:# ✓ Visit http://localhost/register → Create new account# ✓ Check email at http://localhost:8025 → Verify email# ✓ Visit http://localhost/login → Log in with your account# ✓ See http://localhost/dashboard → Protected, authenticated area# ✓ Click logout → Session destroyed
# All of this is automatic with Laravel Breeze!
What You’ll Build
Section titled “What You’ll Build”By the end of this chapter, you will have:
- ✓ Laravel React starter kit installed with Inertia.js via Laravel Breeze
- ✓ Registration page with email/password validation
- ✓ Login page with “remember me” functionality
- ✓ Email verification flow with verification links
- ✓ Password reset via secure email recovery links
- ✓ Dashboard page for authenticated users (protected by middleware)
- ✓ Logout functionality that clears sessions
- ✓ Understanding of how Inertia bridges Laravel backend and React frontend
- ✓ Authentication middleware protecting sensitive routes
- ✓ Customized views matching your CRM branding with Tailwind CSS
- ✓ Ability to access authenticated user data in React components
- ✓ Knowledge of authentication middleware patterns for future team/authorization middleware
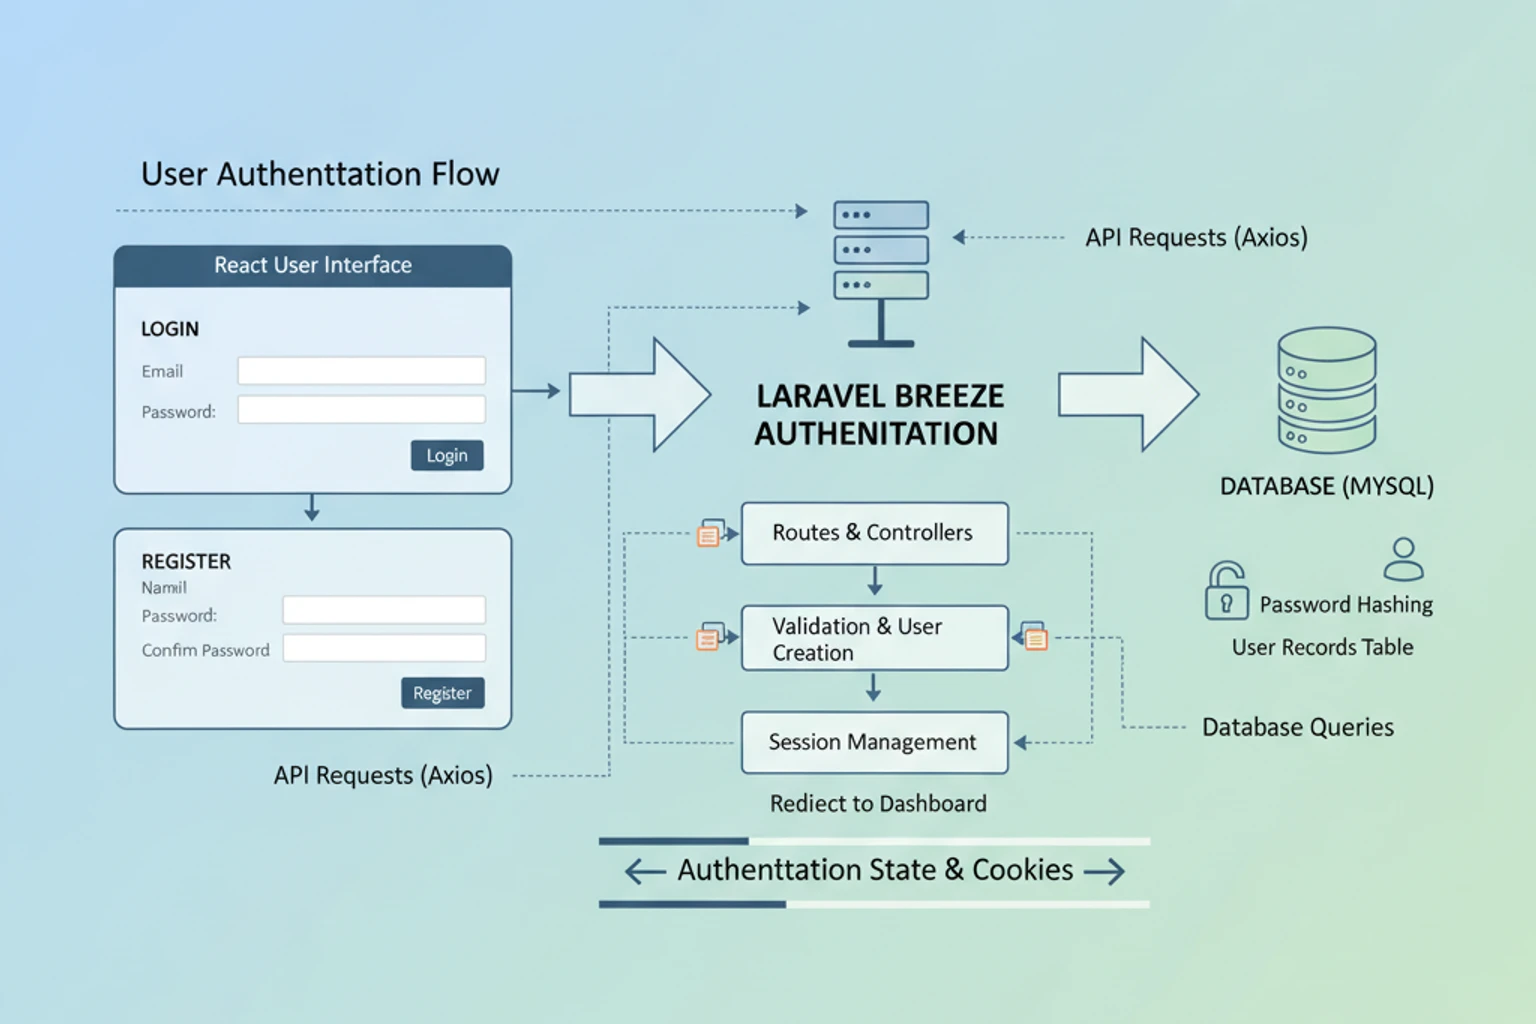
Authentication Flow: How It Works
Section titled “Authentication Flow: How It Works”Before diving into code, let’s visualize how authentication flows through your CRM. This will help you understand what’s happening behind the scenes.
High-Level Flow Diagram
Section titled “High-Level Flow Diagram”┌─────────────────────────────────────────────────────────────────────────┐│ USER AUTHENTICATION FLOW │└─────────────────────────────────────────────────────────────────────────┘
1. REGISTRATION FLOW ┌──────────────┐ ┌────────────┐ │ User visits │─────→ React Registration Form │ Tailwind + │ │ /register │ (email, password validation) │ shadcn/ui │ └──────────────┘ └────────────┘ ↓ ┌──────────────────────────────────────────────────────────────────────┐ │ User submits form → Inertia sends POST to Laravel /register endpoint │ └──────────────────────────────────────────────────────────────────────┘ ↓ ┌────────────────────────────────────────────────────────────┐ │ Laravel validates data, hashes password, creates User │ │ (via Laravel Fortify authentication provider) │ └────────────────────────────────────────────────────────────┘ ↓ ┌────────────────────────────────────────────────────────────┐ │ Verification email sent via Mailhog (or real SMTP) │ │ Email contains: "verify email" button with signed token │ └────────────────────────────────────────────────────────────┘ ↓ ┌────────────────────────────────────────────────────────────┐ │ User checks email (http://localhost:8025 in dev) │ │ Clicks verification link → Laravel verifies email │ └────────────────────────────────────────────────────────────┘ ↓ ┌────────────────────────────────────────────────────────────┐ │ Email verified! User can now log in │ └────────────────────────────────────────────────────────────┘
2. LOGIN FLOW ┌──────────────┐ ┌────────────┐ │ User visits │─────→ React Login Form │ Remember │ │ /login │ (email, password, remember-me) │ me option │ └──────────────┘ └────────────┘ ↓ ┌──────────────────────────────────────────────────────────────────────┐ │ User submits → Inertia sends POST to Laravel /login endpoint │ │ Laravel validates credentials using Fortify │ └──────────────────────────────────────────────────────────────────────┘ ↓ ┌─────────────────────────────────────────────────────────────┐ │ If "remember me" checked: │ │ → Laravel sets encrypted cookie (auto-login for 1 year) │ │ Else: │ │ → Laravel sets session (cleared on browser close) │ └─────────────────────────────────────────────────────────────┘ ↓ ┌────────────────────────────────────────────────────────────┐ │ User authenticated! Redirected to /dashboard │ │ Session contains encrypted User ID + authentication token │ └────────────────────────────────────────────────────────────┘
3. PROTECTED ROUTES (WITH MIDDLEWARE) ┌──────────────────┐ │ User requests │ │ /contacts (or │ │ any protected │ │ route) │ └──────────────────┘ ↓ ┌────────────────────────────────────────────────────────────┐ │ Laravel 'auth' middleware intercepts request │ │ Checks: Does session contain valid authentication token? │ └────────────────────────────────────────────────────────────┘ ↓ ├─ YES: Proceed to controller │ Load user data, return view │ └─ NO: Redirect to /login (User is not authenticated)
4. PASSWORD RESET FLOW ┌──────────────────┐ │ User clicks │ │ "Forgot │ │ password?" │ └──────────────────┘ ↓ ┌────────────────────────────────────────────────────────────┐ │ User enters email → Laravel sends password reset email │ │ Email contains: reset token (expires in 60 minutes) │ └────────────────────────────────────────────────────────────┘ ↓ ┌────────────────────────────────────────────────────────────┐ │ User clicks reset link with token │ │ React form: enter new password (2x for confirmation) │ └────────────────────────────────────────────────────────────┘ ↓ ┌────────────────────────────────────────────────────────────┐ │ Laravel validates token + password requirements │ │ If valid: Update password, token expires │ │ If invalid: Show error (token expired or already used) │ └────────────────────────────────────────────────────────────┘ ↓ ┌────────────────────────────────────────────────────────────┐ │ Password changed! User can log in with new password │ └────────────────────────────────────────────────────────────┘
5. LOGOUT FLOW ┌──────────────┐ │ User clicks │ │ Logout │ └──────────────┘ ↓ ┌────────────────────────────────────────────────────────────┐ │ Inertia sends POST to /logout │ │ Laravel deletes session/cookie │ │ CSRF token invalidated │ └────────────────────────────────────────────────────────────┘ ↓ ┌────────────────────────────────────────────────────────────┐ │ User logged out, redirected to /login │ │ All protected routes now inaccessible │ └────────────────────────────────────────────────────────────┘Key Concepts in the Flow
Section titled “Key Concepts in the Flow”CSRF Protection (Cross-Site Request Forgery):
- Every form submission includes an CSRF token
- Laravel verifies token before processing request
- Prevents attackers from submitting forms on your behalf
- Automatically included by Inertia.js ✅
Password Hashing:
- Passwords are never stored in plain text
- Laravel uses bcrypt (industry standard)
- Even Laravel developers can’t see stored passwords
- Password reset creates new hash, invalidates old one
Session vs Cookie:
- Session: Temporary, cleared when browser closes
- Cookie: Persistent, survives browser restart
- “Remember me” creates a cookie for up to 1 year
- Encrypted, can’t be read by user or attacker
Inertia.js Magic:
- React forms automatically include CSRF token
- Inertia handles page transitions (no full reload)
- Seamless React + Laravel integration
- No separate API needed!
What Happens When Authentication Fails
Section titled “What Happens When Authentication Fails”| Scenario | Result |
|---|---|
User tries to visit /contacts without logging in | Middleware redirects to /login |
| User submits login with wrong password | React form shows error: “These credentials do not match our records” |
| User tries to verify email with expired token | Error: “Token expired. Request a new verification link” |
| User tries to reset password with expired token | Error: “This password reset token is invalid or expired” |
| Session expires after 2 hours of inactivity | Next page visit redirects to /login |
Objectives
Section titled “Objectives”- Install Laravel’s React starter kit using Laravel Breeze
- Understand Inertia.js architecture and how it bridges Laravel and React
- Understand the complete authentication flow (register → verify → login → logout)
- Test the complete authentication flow end-to-end
- Customize React authentication components for your CRM’s branding
- Implement email verification to ensure valid email addresses
- Add password reset functionality for account recovery
- Protect routes with authentication middleware (
auth,verified,guest) - Access authenticated user data in React components using
usePage()hook - Understand Laravel Fortify’s role in authentication
- Use TypeScript with React components for type safety
Step 1: Install React Starter Kit (~15 min)
Section titled “Step 1: Install React Starter Kit (~15 min)”Install Laravel’s official React starter kit using Laravel Breeze, which scaffolds all authentication logic, React components, TypeScript support, and Inertia.js integration.
Actions
Section titled “Actions”- Require Laravel Breeze in your existing
crm-appproject:
# Navigate to your crm-app directory if not already therecd crm-app
# Require Breeze as a development dependency# Breeze is Laravel's official authentication scaffolding toolsail composer require laravel/breeze --dev- Install Breeze with React Stack:
# Run the Breeze installation command with React/Inertia stacksail artisan breeze:install react
# When prompted: "Would you like to use TypeScript?"# Type: yes# This ensures all generated components use TypeScript (.tsx files)
The command scaffolds:
- Authentication routes and controllers (Register, Login, Password Reset, Email Verification)
- React component pages in
resources/js/Pages/ - Layouts and reusable components
- Tailwind CSS configuration
- Inertia.js setup
- Install Node Dependencies:
# Install JavaScript dependencies (React, Inertia, Tailwind, etc.)sail npm install
# Compile frontend assets for the first timesail npm run build
# You should see output like: ✓ 123 modules transformed- Start the Development Server (in a new terminal window):
# This watches your frontend files and recompiles on changessail npm run dev
# Keep this running in the background during development- Run Database Migrations:
# In another terminal, run migrations to create auth tablessail artisan migrate
# Expected: "Migrating: ... (x migrations)"
Expected Result
Section titled “Expected Result”# Verify Docker containers are runningsail ps
# Output should show:laravel.test Upmysql Upredis Upmailhog Up
# Visit http://localhost in your browser# You should see:# ✓ Laravel welcome page with navigation# ✓ "Register" and "Login" links in header# ✓ No JavaScript errors in browser console# ✓ Responsive design works on mobile and desktopWhy It Works
Section titled “Why It Works”Laravel Breeze is the official authentication scaffolding system. It uses:
- Laravel Fortify (
laravel/fortify): Backend authentication logic and controllers for register, login, password reset, email verification - Inertia.js (
inertiajs/inertia): Bridge between Laravel backend and React frontend, creating SPA experience without separate API - React 19: Modern React with hooks and latest features
- TypeScript: Type-safe JavaScript prevents runtime errors
- Tailwind CSS 4: Utility-first CSS framework for rapid UI development
- Vite: Modern JavaScript bundler for fast development and production builds
The Breeze Workflow:
User visits /register ↓Laravel router finds route in routes/web.php ↓RegisteredUserController renders React component via Inertia::render() ↓React component displays form (with client-side form state) ↓User submits form → POST /register ↓Laravel validates data, creates user, sends verification email ↓Inertia redirects to /dashboard or email verification page ↓No full page reload - SPA experience maintainedThe beauty of this approach: You keep Laravel’s routing and controllers, but get React’s interactive frontend.
Troubleshooting
Section titled “Troubleshooting”-
Error: “Docker daemon is not running”
- Ensure Docker Desktop is running before any
sailcommands - Run
docker --versionto verify
- Ensure Docker Desktop is running before any
-
Error during
sail composer require laravel/breeze- Ensure Sail containers are running:
sail up -d - Wait 10 seconds for containers to fully initialize
- Try the command again
- Ensure Sail containers are running:
-
Error: “class not found: BreezeFacade” during
breeze:install- Run
sail composer dump-autoload - Then retry:
sail artisan breeze:install react
- Run
-
“npm ERR! code 1” during
sail npm install- Clear npm cache:
sail npm cache clean --force - Delete
node_modules:sail npm run build(which cleans up) - Try again:
sail npm install
- Clear npm cache:
-
React components not displaying
- Verify
sail npm run devis running in a separate terminal - Check browser console (F12) for JavaScript errors
- Try hard refresh:
Ctrl+Shift+R(Windows) orCmd+Shift+R(Mac) - Verify
.vite/manifest.jsonexists:ls -la public/.vite/
- Verify
-
“Command not found: sail”
- Verify you’re in the
crm-appdirectory - Run
which sail- should show/path/to/crm-app/vendor/bin/sail - If not found, run:
sail composer install
- Verify you’re in the
Step 2: Understand Inertia.js Architecture (~10 min)
Section titled “Step 2: Understand Inertia.js Architecture (~10 min)”Understand how Inertia.js bridges your Laravel backend and React frontend, creating a seamless SPA experience without needing to build a separate API.
Actions
Section titled “Actions”- Understand the Problem Inertia Solves:
Traditional SPA development requires two applications:
- A Laravel REST API backend (
/api/v1/...) - A separate React frontend (with its own routing, state, API calls)
- Complex orchestration between them
Inertia eliminates this complexity by:
- Keeping your familiar Laravel routes (
routes/web.php) - Serving React components from those routes instead of HTML
- Using server-side rendering with reactive client-side updates
- Automatically managing CSRF tokens and form data
- Examine the Inertia Request Flow:
Understanding this flow is key to everything you’ll build:
Step 1: User clicks a link or submits a form        ↓ (Inertia intercepts with special X-Inertia header)
Step 2: Laravel router (routes/web.php) receives request        ↓
Step 3: Controller executes business logic        ↓
Step 4: Controller returns Inertia::render('ComponentName', ['data' => $value])        ↓ (Returns JSON with component name + props)
Step 5: Inertia client-side library swaps component on page        ↓ (No full page reload - SPA experience!)
Step 6: History API updates URL in browser ↓ (User sees new page, but no flicker or reload)- Explore Breeze’s Directory Structure:
# After running breeze:install react, you'll have these key directories:
# React component pages (like MVC Views, but React)ls -la resources/js/Pages/# Auth/#   ├─ Login.tsx#   ├─ Register.tsx#   ├─ ForgotPassword.tsx#   ├─ ResetPassword.tsx#   └─ VerifyEmail.tsx# Dashboard.tsx
# Reusable React components (buttons, forms, etc.)ls -la resources/js/Components/
# Layout components that wrap pagesls -la resources/js/Layouts/# GuestLayout.tsx   (for Login, Register pages)# AuthenticatedLayout.tsx  (for Dashboard)
# Laravel still has all its usual directoriesls -la app/Http/Controllers/Auth/# RegisteredUserController.php# AuthenticatedSessionController.php# PasswordResetLinkController.php# NewPasswordController.php- Examine a Controller-Component Pair:
Open and review these files to see how they work together:
# Backend: The Controllercat app/Http/Controllers/Auth/RegisteredUserController.php
# You'll see it uses Inertia::render() instead of returning HTML:# return Inertia::render('Auth/Register');# This tells Inertia to render: resources/js/Pages/Auth/Register.tsx
# Frontend: The React Componentcat resources/js/Pages/Auth/Register.tsx
# You'll see it uses useForm() hook from Inertia:# const { data, setData, post, errors } = useForm({ ... })# The post() method automatically sends to the Laravel route
Expected Result
Section titled “Expected Result”Clear understanding of:
- No Separate API: Inertia uses your existing Laravel routes - no
/apiendpoints needed - Request Flow: User action → Laravel route → Controller logic → React component update
- Data Flow: Backend sends data as props to React components via
Inertia::render('Name', $props) - Form Handling: React components use
useForm()which automatically handles CSRF and validation - Session-Based Auth: Authentication is server-side (like traditional Laravel), not token-based
Why It Works
Section titled “Why It Works”Inertia’s “magic” is that it combines the best of both worlds:
- Laravel’s Strengths: Server-side routing, validation, authentication, database access
- React’s Strengths: Interactive UI, client-side state, responsive updates without page reloads
You never write API code or manage API versioning. Your React components talk directly to your Laravel controllers through the routes you already know.
For a CRM, this is ideal because:
- Complex business logic stays in PHP/Laravel (where it’s safest)
- UI interactivity happens in React (where it’s best)
- Form validation happens server-side (where it’s most secure)
- Errors automatically display in the React form
Troubleshooting
Section titled “Troubleshooting”-
“Cannot find module @inertiajs/react”
- Run
sail npm installto install dependencies - Verify
node_modules/directory exists
- Run
-
“Inertia is not defined” error in browser console
- Ensure
sail npm run devis running (watching files) - Hard refresh browser:
Cmd+Shift+R(Mac) orCtrl+Shift+R(Windows)
- Ensure
-
Form submissions show 404 errors
- Verify route exists:
sail artisan route:list - Check controller method name matches route
- Verify
useForm({ ... })post URL matches route path
- Verify route exists:
Step 3: Test the Authentication Flow (~15 min)
Section titled “Step 3: Test the Authentication Flow (~15 min)”Test all three scaffolded authentication routes: /register, /login, and /dashboard.
Actions
Section titled “Actions”- Verify Development Environment is Running:
# Terminal 1: Ensure Sail containers are runningsail up -d
# Terminal 2: Ensure frontend is being watched for changessail npm run dev
# Terminal 3: Use this for running artisan commands# (we'll use it later in this step)- Access the Registration Page:
# Navigate to http://localhost/register in your browser# You should see:# ✓ Registration form with Name, Email, Password fields# ✓ "Sign Up" button# ✓ "Already registered? Sign in" link at bottom# ✓ Form styled with Tailwind CSS (looks professional)- Register a New User:
# Fill in the registration form:# Name: John Doe# Email: john@example.com# Password: SecurePassword123!# Confirm Password: SecurePassword123!
# Click "Sign Up" button
# Expected Result:# ✓ Form submits (no page reload - Inertia handles it)# ✓ If email verification is enabled:# → Redirected to /email/verify page# → Shows message about verification email# ✓ If email verification is disabled:# → Redirected to /dashboard# → You are logged in- Verify User Created in Database:
# In Terminal 3, open tinker to inspect the databasesail artisan tinker
# Check if the user was created>>> App\Models\User::all();
# You should see a new user record:# id: 1# name: "John Doe"# email: "john@example.com"# created_at: timestamp of now
# Exit tinker>>> exit- Test Email Verification (if enabled):
# If you were redirected to /email/verify:
# Open Mailhog in your browser: http://localhost:8025# You should see an email with subject "Verify Email Address"
# Click the verification link in the email# Inertia handles this request and marks email as verified
# Verify in database:sail artisan tinker>>> $user = App\Models\User::where('email', 'john@example.com')->first();>>> $user->email_verified_at;# Should show a timestamp (not null)>>> exit- Test Login:
# Log out first (if you're logged in):# Click your name/avatar in top-right → "Log Out"
# Navigate to http://localhost/login# You should see:# ✓ Login form with Email and Password fields# ✓ "Remember Me" checkbox# ✓ "Forgot your password?" link
# Log in with credentials:# Email: john@example.com# Password: SecurePassword123!
# Expected Result:# ✓ Form submits without page reload# ✓ Redirected to /dashboard# ✓ You see welcome message with your name- Verify Authenticated Access:
# On the dashboard, check:# ✓ You see "Dashboard" page heading# ✓ Your name appears in top-right navigation# ✓ There's a "Log Out" option
# Verify you're actually authenticated:sail artisan tinker>>> auth()->user();# Should return your user record
>>> auth()->check();# Should return: true>>> exit- Test Logout:
# Click your name in the top-right# Click "Log Out"
# Expected Result:# ✓ You're redirected to home page# ✓ "Login" and "Register" links reappear in navigation# ✓ You can no longer access /dashboard
Expected Result
Section titled “Expected Result”All three core routes work end-to-end:
✓ /register → Creates user, sends verification email, redirects appropriately✓ /login → Authenticates user, creates session, redirects to dashboard✓ /dashboard → Protected route, only accessible when authenticated✓ Logout → Destroys session, redirects to homeWhy It Works
Section titled “Why It Works”Breeze scaffolds everything you see:
Backend (Laravel Fortify):
RegisteredUserControllerhandles registration logicAuthenticatedSessionControllerhandles login/logout- Built-in email verification support
- Password validation and hashing
Frontend (React + Inertia):
Register.tsxcomponent renders the registration formLogin.tsxcomponent renders the login formDashboard.tsxcomponent accessible only with auth middleware- Forms use Inertia’s
useForm()for state management
The Complete Flow:
User submits Registration Form (React component) ↓POST /register (HTTP request with Inertia header) ↓RegisteredUserController validates input ↓Creates user in database ↓Sends verification email via Mailhog ↓Returns Inertia response with VerifyEmail component ↓React component displays verification prompt (no page reload) ↓User clicks email link ↓Email verified, redirects to dashboardTroubleshooting
Section titled “Troubleshooting”-
“These credentials do not match our records”
- Verify email and password match exactly (case-sensitive on password)
- Ensure user was created:
sail artisan tinker→User::where('email', 'john@example.com')->exists()
-
Email verification link doesn’t work
- Check Mailhog at http://localhost:8025 for the verification email
- Verify
APP_URL=http://localhostin your.envfile - Check that
Usermodel implementsMustVerifyEmailinterface
-
Redirected to login after registration instead of email verification
- This is normal if email verification is disabled in Fortify config
- Check
config/fortify.phpforFeatures::emailVerification()
-
Cannot access dashboard after login
- Verify
sail npm run devis running (frontend needs to be compiled) - Hard refresh browser:
Cmd+Shift+R(Mac) orCtrl+Shift+R(Windows) - Check browser console for JavaScript errors (F12)
- Verify
Step 4: Customize Authentication Views (~20 min)
Section titled “Step 4: Customize Authentication Views (~20 min)”Customize Breeze’s scaffolded React components to match your CRM’s branding using Tailwind CSS and custom styling.
Actions
Section titled “Actions”- Understand Tailwind Configuration:
# View Tailwind configurationcat tailwind.config.js
# This file controls:# - Brand colors (primary, secondary, etc.)# - Font families# - Spacing scales# - Custom utilities# All scaffolded components use these Tailwind variables
You can customize your brand colors here, and all components automatically update.
- Examine the Layout Components:
# Public pages (Login, Register) use this layout:cat resources/js/Layouts/GuestLayout.tsx
# This defines:# - Header/navigation for unauthenticated users# - Overall page structure# - Link to home page
# Authenticated pages (Dashboard) use this layout:cat resources/js/Layouts/AuthenticatedLayout.tsx
# This defines:# - User menu with profile/logout# - Navigation for authenticated users# - Main content area
Both layouts wrap your page components, so global changes apply everywhere.
- Customize the Register Component Title:
The simplest customization: change the page title to match your CRM branding.
# Edit the Register componentnano resources/js/Pages/Auth/Register.tsxLook for the page title inside the component. Change it from the default to your CRM name:
// Before:<h1>Register</h1>
// After (Example: Your CRM name):<h1>Create Your CRM Account</h1>
Save the file (Ctrl+X, then Y, then Enter). Since sail npm run dev is running, the changes compile automatically and appear in your browser within seconds.
- Customize the Layout Appearance:
To customize colors, fonts, and spacing, edit the Tailwind config:
# Edit tailwind.config.jsnano tailwind.config.js
# Look for the `theme` section# You can customize:# - colors.primary (change primary color)# - fontFamily.sans (change default font)# - spacing (change margin/padding scales)
Example: Change the primary brand color from the default to your brand color.
- Test Your Customization:
# Save your changes# Visit http://localhost/register in your browser
# You should see:# ✓ Your custom title# ✓ Updated styling (if you changed Tailwind config)# ✓ All functionality works as before
Expected Result
Section titled “Expected Result”✓ Page title changed to reflect your CRM✓ Tailwind styling customized (optional)✓ Components compile automatically with sail npm run dev✓ All form functionality remains intact✓ Changes visible instantly in browserWhy It Works
Section titled “Why It Works”Separation of Concerns:
- Tailwind Config (
tailwind.config.js): Brand identity lives here - Layout Components (
GuestLayout.tsx,AuthenticatedLayout.tsx): Global structure - Page Components (
Register.tsx,Login.tsx): Specific page content
Changing one affects all pages that use it. Need to rebrand from blue to green? Update Tailwind once, everything changes.
Development Workflow:
- Edit a
.tsxfile - Save it (Ctrl+S)
sail npm run devdetects the change- Asset compiles automatically (~100ms)
- Browser auto-refreshes
- You see the change immediately
No manual build steps, no waiting for compilation.
Troubleshooting
Section titled “Troubleshooting”-
Changes not appearing in browser
- Verify
sail npm run devis running in Terminal 2 - Hard refresh browser:
Cmd+Shift+R(Mac) orCtrl+Shift+R(Windows) - Check terminal for compilation errors
- Verify
-
TypeScript errors in code
- Check for syntax mistakes (missing semicolons, quotes, etc.)
- Terminal will show which file has the error
- Fix the error and save - it will recompile
-
Tailwind classes not applying
- Verify class name is valid Tailwind class
- Build Tailwind CSS:
sail npm run build - Check
tailwind.config.jsto see available utilities
Step 5: Configure Email Verification (~15 min)
Section titled “Step 5: Configure Email Verification (~15 min)”Enable email verification so new users must verify their email address before accessing the CRM application.
Actions
Section titled “Actions”- Enable MustVerifyEmail on the User Model:
# Open the User modelcat app/Models/User.php
# Check if it implements MustVerifyEmail interface# If not, add it:<?php
declare(strict_types=1);
namespace App\Models;
use Illuminate\Contracts\Auth\MustVerifyEmail;use Illuminate\Database\Eloquent\Factories\HasFactory;use Illuminate\Foundation\Auth\User as Authenticatable;// ... other imports
class User extends Authenticatable implements MustVerifyEmail // ← Add this{ use HasFactory; // ... rest of model}- Verify Fortify Has Email Verification Enabled:
# Check the Fortify configurationcat config/fortify.php
# Look in the Features section# You should see:# Features::emailVerification(),
# If you don't see it, add it to enable email verification- Protect Routes with
verifiedMiddleware:
In routes/web.php, routes that require email verification should use the verified middleware:
Route::middleware(['auth', 'verified'])->group(function () {    Route::get('/dashboard', ...)        ->name('dashboard');
    // Any other authenticated routes go here});
The verified middleware (provided by Fortify) redirects unverified users to /email/verify.
- Test the Email Verification Flow:
# 1. Register a NEW user (one without an email_verified_at timestamp)# Visit http://localhost/register
# 2. After registration, you should be redirected to /email/verify# This page shows: "Please verify your email address"
# 3. Check Mailhog for the verification email# Open http://localhost:8025 in a new tab
# 4. Find the email with subject "Verify Email Address"
# 5. Click the verification link in the email
# 6. You should be redirected to dashboard# Email is now verified!- Verify in Database:
# Confirm the email is marked as verifiedsail artisan tinker
>>> $user = App\Models\User::latest()->first();>>> $user->email_verified_at;# Should show a timestamp like: 2024-12-01 10:30:45
>>> exit
Expected Result
Section titled “Expected Result”✓ New users see email verification prompt after registration✓ Verification email sent to Mailhog✓ Clicking link verifies email and redirects to dashboard✓ Unverified users cannot access protected routes✓ Option to resend verification email availableWhy It Works
Section titled “Why It Works”Email Verification Process:
- User registers with email
email_verified_atcolumn is NULL initially- Fortify sends verification email with unique link
- Link contains: email + hash (prevents tampering)
- User clicks link → Laravel verifies hash matches email
- If valid: sets
email_verified_atto current timestamp verifiedmiddleware now allows access
Why It Matters for CRM:
- Real email addresses: Users can’t register with fake emails
- Communication: You can safely email registered users
- Security: Email becomes the account recovery method (password reset)
- Spam prevention: Bots can’t register without email verification
Troubleshooting
Section titled “Troubleshooting”-
Email verification link doesn’t appear in Mailhog
- Verify
MAIL_DRIVER=login.env(orsmtp/mailhog) - Check that
MAIL_FROM_ADDRESSis set in.env - Ensure user was created before email sent
- Verify
-
“Invalid verification link” error
- Link is tied to specific email address
- If user changed email, old link won’t work
- Resend verification email from
/email/verifypage
-
Already-registered users can’t access dashboard
- Old users created before email verification was enabled have NULL
email_verified_at - You can manually mark them as verified in database:
Terminal window sail artisan tinker>>> User::update(['email_verified_at' => now()])>>> exit - Old users created before email verification was enabled have NULL
-
Redirected to /email/verify even after clicking link
- Hard refresh browser:
Cmd+Shift+R(Mac) orCtrl+Shift+R(Windows) - Check database to confirm
email_verified_atis not null - Clear browser cookies and try again
- Hard refresh browser:
Step 6: Implement Password Reset (~15 min)
Section titled “Step 6: Implement Password Reset (~15 min)”Enable users to securely reset forgotten passwords through an email recovery link.
Actions
Section titled “Actions”- Verify Password Reset is Enabled in Fortify:
# Check the Fortify configurationcat config/fortify.php
# Look for:# Features::resetPasswords(),
# If missing, add it to enable password reset- Test the Password Reset Flow:
# Step 1: Visit the forgot password page# Navigate to http://localhost/forgot-password
# Step 2: Enter your email address# Example: john@example.com
# Step 3: Click "Email Password Reset Link"
# Expected:# ✓ Page shows "We have emailed your password reset link"# ✓ No errors- Check Mailhog for the Reset Email:
# Open Mailhog in browser: http://localhost:8025
# You should see an email with:# Subject: "Reset Password Notification"# From: noreply@example.com# To: john@example.com
# The email contains a password reset link
# Click the link in the email- Reset Your Password:
# You should be redirected to: http://localhost/reset-password/{token}
# This page shows:# - Email field (pre-filled with your email)# - New Password field# - Confirm Password field# - "Reset Password" button
# Enter your new password (must match confirmation)# Example: NewSecurePassword456!
# Click "Reset Password"
# Expected:# ✓ You are logged in automatically# ✓ Redirected to dashboard- Verify the Password Reset Worked:
# Try logging out and logging back in with the NEW password# You should be able to log in successfully
# Confirm old password no longer works:# Visit http://localhost/login# Try logging in with OLD password# Should see: "These credentials do not match our records"
Expected Result
Section titled “Expected Result”✓ Forgot password page accessible at /forgot-password✓ Email submission works with any registered email✓ Password reset email arrives in Mailhog✓ Reset link is valid and opens password form✓ New password saves correctly✓ User can log in with new password✓ Old password no longer worksWhy It Works
Section titled “Why It Works”Password Reset Security (Built-in):
Breeze + Fortify implements industry-standard password reset:
- Unique Tokens: Each reset link contains a cryptographically random token
- Hashed Tokens: Database stores only the hash (not the token itself)
- Time-Limited: Tokens expire after
PASSWORD_RESET_TIMEOUT(default 60 minutes) - Email Verification: Only the email owner can complete the reset
- One-Time Use: Token is deleted after being used once
- CSRF Protection: All requests are protected by Laravel’s CSRF middleware
The Complete Flow:
User clicks "Forgot Password" ↓Submits email address ↓Fortify generates random token ↓Token is hashed and stored in password_resets table ↓Email sent with link: /reset-password/{token} ↓User receives email and clicks link ↓Laravel verifies token is valid and not expired ↓Shows password reset form ↓User submits new password ↓Laravel verifies token again, updates password, deletes token ↓User is logged in with new passwordWhy This is Secure:
- No passwords transmitted via email (only reset link)
- Token expires after 1 hour (lost/shared links become useless)
- Token is single-use (can’t be reused if someone intercepts it)
- Hashed tokens prevent database leaks
- CSRF protection prevents form hijacking
Troubleshooting
Section titled “Troubleshooting”-
“We can’t find a user with that email address”
- Email must match exactly (case-insensitive but must exist)
- Verify user was created with this email:
sail artisan tinker→User::where('email', 'john@example.com')->exists()
-
Reset email doesn’t arrive in Mailhog
- Verify
MAIL_FROM_ADDRESSis set in.env - Check Mailhog is running:
sail ps(should show mailhog container) - Check
MAIL_HOST=mailhogandMAIL_PORT=1025in.env
- Verify
-
“Password reset link has expired”
- Default timeout is 60 minutes
- Request a NEW reset link
- For testing, you can increase timeout in
.env:PASSWORD_RESET_TIMEOUT=86400 # 24 hours for testing
-
Reset link opens but shows 404 error
- Token may be malformed or expired
- Request a new reset link
- Check browser console for errors
-
Changed password but can’t log in
- Verify new password was entered correctly (case-sensitive)
- Password must meet Laravel’s validation rules
- Clear browser cookies and try again
Step 7: Access Authenticated User in React Pages (~10 min)
Section titled “Step 7: Access Authenticated User in React Pages (~10 min)”Learn how to access the authenticated user’s data in Inertia components using the usePage hook and understand how Breeze shares auth data automatically.
Actions
Section titled “Actions”- Understand Inertia’s Shared Data Model:
Breeze automatically shares the authenticated user with all pages via Inertia’s shared data. You never have to manually fetch the user.
# Open the middleware that handles thiscat app/Http/Middleware/HandleInertiaRequests.php
# You'll see it shares:# - auth.user (the authenticated user object)# - auth.can (user permissions/abilities)# - flash messages# All pages automatically receive this data as props- Access User in React Components:
import { usePage } from '@inertiajs/react';
export default function Dashboard() {  // usePage() gives you access to ALL shared data  const { auth } = usePage<{ auth: { user: User } }>().props;
// Now you can use the authenticated user return ( <div> <h1>Welcome, {auth.user.name}!</h1> <p>Email: {auth.user.email}</p> </div> );}- Display User Menu in Navigation:
import { usePage } from '@inertiajs/react';
export default function AuthenticatedLayout({ children }) {  const { auth } = usePage<{ auth: { user: User } }>().props;
return ( <div> <header> <div className="flex justify-between items-center"> <h1>CRM Dashboard</h1> {/* User menu */} <div className="flex items-center gap-4"> <span>{auth.user.name}</span> <button> <img src={`gravatar URL for ${auth.user.email}`} /> </button> </div> </div> </header> <main>{children}</main> </div> );}- Access User in Backend (PHP):
<?php
namespace App\Http\Controllers;
class SomeController extends Controller{    public function index()    {        // Get authenticated user        $user = auth()->user();
        // Check if authenticated        if (!auth()->check()) {            return redirect('/login');        }
        // Use user data        return Inertia::render('SomePage', [            'userName' => $user->name,        ]);    }}
Expected Result
Section titled “Expected Result”✓ React components can access authenticated user via usePage()✓ User name and email display in navigation✓ Backend can access user with auth()->user()✓ User object includes all columns from users table✓ Unauthenticated users don't see user menuWhy It Works
Section titled “Why It Works”Inertia’s Shared Data Pattern:
Breeze’s HandleInertiaRequests middleware automatically sends the authenticated user to every page. This is different from traditional Laravel where you’d pass user data in the view context.
Route Handler → Controller returns Inertia::render() ↓Inertia middleware intercepts ↓Adds shared data (auth, flash messages, etc.) ↓Sends response with component name + props + shared data ↓React component receives all data as props automaticallyThe benefit: You never need to explicitly pass the user to every page. It’s automatically available everywhere via usePage().
For Chapter 08 (Teams):
When you implement teams, you’ll share the current team the same way:
// In HandleInertiaRequests middleware'auth' => [ 'user' => auth()->user(), 'currentTeam' => auth()->user()->currentTeam, // Add this],Then in React:
const { auth } = usePage().props;// Now you have: auth.user and auth.currentTeamTroubleshooting
Section titled “Troubleshooting”-
usePage() returns undefinedor type errors- Verify component is inside AuthenticatedLayout
- Check that
authis being shared in middleware - Ensure imports are correct:
import { usePage } from '@inertiajs/react'
-
User data not showing
- Check browser DevTools → Network → XHR request
- Look for response payload to see if user is included
- Verify Inertia::render() is being called (not a simple return)
-
Cannot access user properties
- Use TypeScript interface for type safety
- Check if property exists on User model
- Verify user was created with that column in database
Troubleshooting Guide
Section titled “Troubleshooting Guide”Common Authentication Issues
Section titled “Common Authentication Issues”Issue: “CSRF Token Mismatch”
Symptom: Error page appears when trying to submit registration/login form
Cause: CSRF token is missing or expired. Inertia should handle this automatically, but it can fail if:
- Cookies are disabled
- Browser is in strict privacy mode
- Session timeout occurred
Solution:
# Verify CSRF is enabled in configcat config/session.php# Ensure 'secure' is false for local development
# Clear browser cookies and try again# Check Network tab → Headers for X-CSRF-TOKEN
# If still failing, manually add to .env:SESSION_DRIVER=cookie
Issue: “These Credentials Do Not Match Our Records”
Symptom: Login fails even with correct credentials
Cause: Multiple possible causes - incorrect email, password typo, user not actually created
Solution:
# Verify user exists in databasesail artisan tinker>>> App\Models\User::where('email', 'test@example.com')->first();
# Verify password hash (passwords are hashed, can't verify directly)# But try logging in with a known good password
# Check if account is locked (if you have lockout features)# Reset by creating new user: User::create([...])
Issue: “The Email Has Already Been Taken”
Symptom: Registration fails saying email already exists
Cause: Email is genuinely already registered
Solution:
# Check if user existssail artisan tinker>>> App\Models\User::where('email', 'test@example.com')->exists();# If true, use different email or delete user:>>> User::where('email', 'test@example.com')->delete();
# For testing, reset entire users table:>>> User::truncate();
Issue: Email Verification Email Not Sent
Symptom: Registration succeeds but no email in Mailhog
Cause: Mail configuration incorrect or event not fired
Solution:
# Check mail drivercat .env | grep MAIL_
# Should show:MAIL_DRIVER=logMAIL_HOST=mailhogMAIL_PORT=1025
# Check logs insteadcat storage/logs/laravel.log# Should show "Mailing: App\Mail\VerifyEmail"
# Verify User model fires Registered event:cat app/Models/User.php# Should have: use CreatesUserProvider;
Issue: “Token Mismatch” on Password Reset
Symptom: Password reset link shows error about invalid token
Cause: Token in URL doesn’t match token in database (usually expired)
Solution:
# Tokens expire after PASSWORD_RESET_TIMEOUT# Default is 3600 seconds (1 hour)cat .env | grep PASSWORD_RESET_TIMEOUT
# If testing and link is old:# Request a new password reset# Use the link within the timeout window
# Increase timeout for testing:PASSWORD_RESET_TIMEOUT=86400  # 24 hours
Issue: React Component Won’t Load / JavaScript Errors
Symptom: Blank page or console errors when visiting registration/login pages
Cause: Frontend build failed or assets not compiled
Solution:
# Ensure npm run dev is runningsail npm run dev
# Check for TypeScript/build errors in terminal output
# Force rebuildsail npm run build
# Clear browser cache (Ctrl+Shift+Delete)
# Check Network tab → fetch XHR# Look for 404 errors on .js or .css files
# Verify Vite manifest exists:ls -la public/.vite/manifest.json
Issue: “Unauthenticated” When Visiting Protected Routes
Symptom: Redirected to login even though you’re logged in
Cause: Session not being recognized, or middleware issue
Solution:
# Verify you're actually logged insail artisan tinker>>> auth()->check();# Should return true
# If false, session is lost:# Clear browser cookies and re-login
# Check session configurationcat config/session.php# Verify SESSION_DRIVER is 'cookie' (for local)
# For production, may need:SESSION_DRIVER=databaseSESSION_LIFETIME=120SESSION_SECURE_COOKIES=true
Issue: Two-Factor Authentication Blocking Login
Symptom: After logging in, redirected to two-factor setup or verification page
Cause: Two-factor authentication is enabled in Laravel Fortify
Solution:
# Check Fortify configurationcat config/fortify.php
# Find Features::twoFactorAuthentication()# If enabled, complete the 2FA setup flow or disable for development:
# Comment out two-factor feature in config/fortify.php:// Features::twoFactorAuthentication(),
Common Authentication Errors & Solutions
Section titled “Common Authentication Errors & Solutions”When implementing authentication, you’ll likely encounter these issues. Here’s how to solve them:
Error 1: “419 Page Expired”
Section titled “Error 1: “419 Page Expired””Symptom: After filling a form and clicking submit, you see “419 Page Expired” error.
Root Cause: CSRF token is missing or expired. This happens when:
- React form doesn’t include the CSRF token
- You manually refresh page, invalidating the token
- Session cookie is missing
Solution:
# 1. Check that CSRF token is in the form# Open browser DevTools → Elements → inspect the form# You should see: <input type="hidden" name="_token" value="..."/>
# 2. If missing, verify Inertia middleware includes CSRFgrep -n "csrf_token" app/Http/Middleware/HandleInertiaRequests.php
# 3. Clear browser cookies and try again# (Developer Tools → Application → Cookies → Delete all)
# 4. Hard refresh: Ctrl+Shift+R (or Cmd+Shift+R on Mac)
# 5. If still failing, check Laravel logtail -f storage/logs/laravel.log
Error 2: “These credentials do not match our records”
Section titled “Error 2: “These credentials do not match our records””Symptom: Login form shows error message even with correct password.
Root Causes:
- Email doesn’t exist in database
- Email is not verified (if email verification is enabled)
- User typed password incorrectly
Solution:
# 1. Verify user exists in databasesail artisan tinker>>> App\Models\User::where('email', 'john@example.com')->first();
# 2. Check if email is verified>>> $user = App\Models\User::find(1);>>> $user->email_verified_at;  # Should NOT be null
# 3. If not verified, mark as verified manually (dev only!)>>> $user->markEmailAsVerified();
# 4. If user doesn't exist, register again>>> exit
Error 3: “TokenMismatchException” in logs
Section titled “Error 3: “TokenMismatchException” in logs”Symptom: Form submissions fail silently or show 419 error. Logs show “TokenMismatchException”.
Root Cause: Session is being regenerated, invalidating CSRF token. Common when:
- Multiple requests happen simultaneously
- Session middleware conflicting with authentication
Solution:
# 1. Check session configurationcat config/session.php# Verify: 'lifetime' => env('SESSION_LIFETIME', 120)
# 2. Clear sessions and try againsail artisan session:clear
# 3. Check browser console for JavaScript errors# Press F12 in browser → Console tab# Fix any TypeScript/JavaScript errors
# 4. Restart Laravel containersail restart
Error 4: “Undefined variable: errors in view”
Section titled “Error 4: “Undefined variable: errors in view””Symptom: React component crashes with “errors is undefined” when form has validation errors.
Root Cause: Form validation errors aren’t being passed to React component.
Solution:
// In the store() method, ensure validation errors are passed:
use Illuminate\Validation\ValidationException;
public function store(Request $request){    // Use validate() which throws ValidationException    $validated = $request->validate([        'name' => ['required', 'string', 'max:255'],        'email' => ['required', 'string', 'email', 'max:255', 'unique:users'],        'password' => ['required', 'string', 'min:8', 'confirmed'],    ]);
    // ... create user ...}
// The validate() method automatically passes errors back to React via Inertia
Error 5: “Email verification not working”
Section titled “Error 5: “Email verification not working””Symptom: User registers, sees email verification page, but verification link doesn’t work.
Root Causes:
- Email not actually being sent (check Mailhog)
- Verification URL configuration incorrect
- Email service not configured
Solution:
# 1. Check Mailhog for emails (development only)# Open http://localhost:8025 in browser# You should see an email with subject "Verify Email Address"
# 2. If no email appears, check Laravel configurationgrep -n "MAIL_" .env# Should show: MAIL_HOST=mailhog, MAIL_PORT=1025
# 3. Test email manually in Tinkersail artisan tinker>>> Mail::raw('Test', function($m) { $m->to('test@example.com'); });
# 4. If production, configure SMTP properly in .env# MAIL_HOST=smtp.mailtrap.io# MAIL_USERNAME=your_username# MAIL_PASSWORD=your_password
# 5. Resend verification email# In browser, click "Didn't receive the email?" → resend
Error 6: “Remember me” not working
Section titled “Error 6: “Remember me” not working”Symptom: Browser closes, but “remember me” doesn’t keep you logged in.
Root Cause: “Remember me” cookie not being set or browser rejecting it.
Solution:
# 1. Check browser allows cookies# Settings → Privacy → Allow cookies for this site
# 2. Verify remember_me token was createdsail artisan tinker>>> DB::table('personal_access_tokens')->count();# Should show tokens after clicking "remember me"
# 3. Check cookie in browser DevTools# Press F12 → Application → Cookies# Should see "laravel_token" or similar cookie
# 4. If using HTTPS, ensure Secure flag is set# Check config/session.php:grep -n "secure" config/session.php# In production, should be: 'secure' => env('SESSION_SECURE_COOKIES', false)
Error 7: “Protected route redirects to login when already logged in”
Section titled “Error 7: “Protected route redirects to login when already logged in””Symptom: User is logged in (can see dashboard), but visiting protected route redirects to login.
Root Causes:
- Session not shared between requests
- Authentication middleware not applied correctly
- User session expired
Solution:
// Verify middleware is applied correctly:
Route::middleware(['auth'])->group(function () {    Route::get('/dashboard', DashboardController::class)->name('dashboard');    Route::get('/contacts', ContactController::class)->name('contacts');    // ... other protected routes});
// 'auth' middleware checks if user is logged in// If not, redirects to login
// Check middleware configuration:php artisan route:list | grep -i auth// Should show "auth" in the middleware column for protected routes
Error 8: “Session expires immediately after login”
Section titled “Error 8: “Session expires immediately after login””Symptom: Login succeeds, but after 1-2 minutes, redirected back to login.
Root Causes:
- Session lifetime too short
- Redis not configured properly (if using Redis for sessions)
- Session garbage collection running
Solution:
# 1. Check session lifetime (default 120 minutes)grep -n "SESSION_LIFETIME" .env# Should be: SESSION_LIFETIME=120  (or higher)
# 2. If using Redis, verify connectionsail artisan tinker>>> Redis::ping();# Should return: "PONG"
# 3. Clear all sessions and start freshsail artisan session:clearsail artisan cache:clear
# 4. Restart containerssail restart
Error 9: “Logout not working - still authenticated”
Section titled “Error 9: “Logout not working - still authenticated””Symptom: Clicking logout, but refreshing page shows user still logged in.
Root Cause: Logout action not fully completing or session not being cleared.
Solution:
// Verify logout endpoint exists in routes/web.phpRoute::post('/logout', [AuthenticatedSessionController::class, 'destroy'])    ->middleware('auth')    ->name('logout');
// Check that React component calls logout correctly// In Resources/js/Pages/Dashboard.tsx or similar:import { useForm } from '@inertiajs/react';
export default function Dashboard() {    const { post } = useForm();
    const logout = () => {        post(route('logout'));    };
    return (        <button onClick={logout}>Logout</button>    );}
// Verify session is clearedsail artisan tinker>>> Auth::check();  # Should return: false after logout
Error 10: “Can’t access user data in React component”
Section titled “Error 10: “Can’t access user data in React component””Symptom: React component can’t access authenticated user (e.g., props.auth.user is undefined).
Root Cause: User not being passed to frontend via Inertia.
Solution:
// Ensure user is shared with all Inertia responses:
public function share(Request $request): array{    return array_merge(parent::share($request), [        'auth' => [            'user' => $request->user(),  # This passes authenticated user        ],    ]);}
// Then in React component:import { usePage } from '@inertiajs/react';
export default function Dashboard() {    const { auth } = usePage().props;
    return (        <div>Welcome, {auth.user.name}!</div>    );}
Debugging Checklist
Section titled “Debugging Checklist”Before asking for help, verify these:
# 1. Containers running?sail ps# All 4 containers should show "Up"
# 2. Frontend dev server running?sail npm run dev# Terminal should show "ready on http://localhost:5173"
# 3. Laravel log shows errors?tail -f storage/logs/laravel.log# Check for authentication/validation errors
# 4. Browser console clean?# Press F12 → Console tab → Any red errors?
# 5. Database has users?sail artisan tinker>>> App\Models\User::count();# Should return a number > 0
# 6. Email verification enabled?grep -n "verify" config/fortify.php# If commented out, email verification is disabled
# 7. Clear everything and restartsail artisan config:clearsail artisan cache:clearsail artisan session:clearsail restart
Exercises
Section titled “Exercises”Exercise 1: Complete Registration and Verification Flow (~10 min)
Section titled “Exercise 1: Complete Registration and Verification Flow (~10 min)”Goal: Practice the full authentication cycle from start to finish
Create a new user account and verify the complete flow:
- Visit
http://localhost/register - Fill in all fields:
- Name: Your Name
- Company Name: Your Company (from Step 4)
- Email: yourtest@example.com
- Password: SecurePassword123!
- Confirm Password: SecurePassword123!
- Submit the form
- Check Mailhog at
http://localhost:8025 - Find the verification email
- Click the verification link in the email
- You should be redirected to the dashboard (or login page if verification required)
- Log in with your email and password
- Verify the dashboard shows “You are logged in”
Validation:
# Verify user was created with company namesail artisan tinker>>> $user = App\Models\User::where('email', 'yourtest@example.com')->first();>>> $user->name; # Should show: Your Name>>> $user->company_name; # Should show: Your Company>>> $user->email_verified_at; # Should show a timestamp (not null)>>> exitExpected result: User created, email verified, authentication working.
Exercise 2: Test Password Reset Flow (~15 min)
Section titled “Exercise 2: Test Password Reset Flow (~15 min)”Goal: Verify the password reset mechanism works correctly
- Log out from your account (if logged in)
- Visit
http://localhost/forgot-password - Enter your test email address (yourtest@example.com)
- Click “Email Password Reset Link”
- Page shows “We have emailed your password reset link”
- Check Mailhog at
http://localhost:8025 - Find the password reset email
- Click the reset link
- You should see a password reset form
- Enter a new password:
NewPassword456! - Confirm the new password:
NewPassword456! - Click “Reset Password”
- You should be logged in or redirected to dashboard
- Try logging in with the NEW password to confirm it works
Validation:
# Old password should no longer work# New password should authenticate the user# Attempt login in browser to confirmExpected result: Password successfully reset and new credentials work.
Exercise 3: Build a Protected Dashboard Route (~20 min)
Section titled “Exercise 3: Build a Protected Dashboard Route (~20 min)”Goal: Create a dashboard page that requires authentication
Create a new dashboard page and middleware-protected route:
- Create a new React component for the dashboard:
# Create the filemkdir -p resources/js/Pagesimport { Head, usePage } from '@inertiajs/react';import { AuthenticatedLayout } from '@/Layouts/AuthenticatedLayout';
interface Props { auth: { user: { id: number; name: string; email: string; company_name?: string; }; };}
export default function Dashboard({ auth }: Props) { const user = usePage<Props>().props.auth.user;
return ( <AuthenticatedLayout> <Head title="Dashboard" />
<div className="py-12"> <div className="max-w-7xl mx-auto sm:px-6 lg:px-8"> <div className="bg-white dark:bg-gray-800 overflow-hidden shadow-sm sm:rounded-lg"> <div className="p-6"> <h1 className="text-3xl font-bold mb-2"> Welcome, {user.name}! </h1> <p className="text-gray-600 dark:text-gray-400 mb-4"> Your CRM dashboard is ready. </p>
<div className="mt-6 grid grid-cols-1 md:grid-cols-3 gap-4"> <div className="bg-blue-50 dark:bg-blue-900 p-4 rounded-lg"> <h3 className="font-semibold text-blue-900 dark:text-blue-100"> Account Details </h3> <p className="text-sm text-blue-800 dark:text-blue-200 mt-1"> Email: {user.email} </p> {user.company_name && ( <p className="text-sm text-blue-800 dark:text-blue-200"> Company: {user.company_name} </p> )} </div>
<div className="bg-green-50 dark:bg-green-900 p-4 rounded-lg"> <h3 className="font-semibold text-green-900 dark:text-green-100"> Status </h3> <p className="text-sm text-green-800 dark:text-green-200 mt-1"> ✓ Email Verified </p> <p className="text-sm text-green-800 dark:text-green-200"> ✓ Authenticated </p> </div>
<div className="bg-purple-50 dark:bg-purple-900 p-4 rounded-lg"> <h3 className="font-semibold text-purple-900 dark:text-purple-100"> Next Steps </h3> <p className="text-sm text-purple-800 dark:text-purple-200 mt-1"> Set up your first contact or team members. </p> </div> </div> </div> </div> </div> </div> </AuthenticatedLayout> );}- Create a DashboardController:
# Generate the controllersail artisan make:controller DashboardController<?php
declare(strict_types=1);
namespace App\Http\Controllers;
use Inertia\Response;use Inertia\Inertia;
class DashboardController extends Controller{ public function __invoke(): Response { return Inertia::render('Dashboard'); }}- Add the protected route to
routes/web.php:
# Add to routes/web.php inside the authenticated middleware group
Route::middleware(['auth', 'verified'])->group(function () { Route::get('/dashboard', DashboardController::class)->name('dashboard');});- Test the protected route:
# 1. Visit http://localhost/dashboard without logging in# Expected: Redirected to /login
# 2. Log in with your test account# 3. Visit http://localhost/dashboard again# Expected: Dashboard displays with your information
# 4. Verify the dashboard shows:# ✓ Your name# ✓ Your email# ✓ Your company name (if filled during registration)# ✓ Authentication statusValidation:
# Test route protection# - Unauthenticated users → redirected to login# - Authenticated users → see dashboard# - Unverified users → redirected to email verification (if middleware enabled)
# Verify routing workssail artisan route:list | grep dashboard# Should show: GET|POST /dashboard (Dashboard)
Expected result: Dashboard page is protected, only authenticated users can access it.
Exercise 4: Create a User Profile Page (~15 min)
Section titled “Exercise 4: Create a User Profile Page (~15 min)”Goal: Build a page where users can view and update their profile
Create a profile page with ability to view and edit user information:
import { Head, useForm } from '@inertiajs/react';import { AuthenticatedLayout } from '@/Layouts/AuthenticatedLayout';import { Input } from '@/Components/ui/input';import { Button } from '@/Components/ui/button';
export default function Profile({ auth }: any) {  const { data, setData, post, processing, errors } = useForm({    name: auth.user.name,    company_name: auth.user.company_name || '',  });
  const submit = (e: React.FormEvent) => {    e.preventDefault();    post(route('profile.update'));  };
  return (    <AuthenticatedLayout>      <Head title="Profile" />
      <div className="py-12">        <div className="max-w-2xl mx-auto sm:px-6 lg:px-8">          <div className="bg-white dark:bg-gray-800 shadow-sm sm:rounded-lg">            <div className="p-6">              <h1 className="text-2xl font-bold mb-6">Your Profile</h1>
              <form onSubmit={submit} className="space-y-4">                <div>                  <label className="block font-medium text-gray-700 dark:text-gray-300">                    Name                  </label>                  <Input                    type="text"                    value={data.name}                    onChange={(e) => setData('name', e.target.value)}                  />                  {errors.name && (                    <p className="text-red-500 text-sm mt-1">{errors.name}</p>                  )}                </div>
                <div>                  <label className="block font-medium text-gray-700 dark:text-gray-300">                    Company Name                  </label>                  <Input                    type="text"                    value={data.company_name}                    onChange={(e) => setData('company_name', e.target.value)}                  />                  {errors.company_name && (                    <p className="text-red-500 text-sm mt-1">                      {errors.company_name}                    </p>                  )}                </div>
                <div>                  <p className="text-gray-600 dark:text-gray-400">                    Email: {auth.user.email}                  </p>                  <p className="text-sm text-gray-500 dark:text-gray-400">                    Email address cannot be changed here                  </p>                </div>
                <Button type="submit" disabled={processing}>                  {processing ? 'Saving...' : 'Save Changes'}                </Button>              </form>            </div>          </div>        </div>      </div>    </AuthenticatedLayout>  );}
Add the route and controller method to handle profile updates.
Validation: Profile page loads with current data, updates save to database.
Wrap-up
Section titled “Wrap-up”Congratulations! You have successfully implemented a complete authentication system for your CRM application using Laravel’s React starter kit and Inertia.js.
What You’ve Accomplished
Section titled “What You’ve Accomplished”Throughout this chapter, you’ve:
- ✓ Installed Laravel’s React starter kit with Inertia.js, React 19, TypeScript, and Tailwind CSS 4
- ✓ Understood Inertia’s architecture - how it bridges Laravel backend and React frontend without a separate API
- ✓ Tested the complete authentication flow - registration, login, email verification, and logout
- ✓ Customized authentication components - added company field and CRM branding to registration
- ✓ Implemented email verification - ensured users own their email addresses before accessing the system
- ✓ Set up password reset - allowed users to securely recover forgotten passwords
- ✓ Built protected routes - created middleware-guarded pages only authenticated users can access
- ✓ Understood Laravel Fortify - the authentication backend powering all these features
- ✓ Practiced TypeScript + React - built modern, type-safe frontend components
Key Concepts You’ve Learned
Section titled “Key Concepts You’ve Learned”- Inertia.js Bridge: No separate API needed - React components communicate directly with Laravel routes
- Server-Side Routing: Keep your familiar Laravel routing instead of complex client-side routing
- Form Handling: Inertia’s
useForm()hook automatically syncs with Laravel validation - Middleware Protection: The
authandverifiedmiddleware protect routes from unauthorized access - Email-Based Recovery: Both email verification and password reset rely on secure email links
- Database Customization: Adding custom fields (like company_name) involves migration, model, and form updates
Real-World Applications
Section titled “Real-World Applications”This authentication system you just built is production-ready for:
- SaaS applications: Multi-user accounts with company information
- CRM systems: Role-based access control (coming in future chapters)
- Team collaboration: Team members with different permissions
- Security: Email verification and password recovery mechanisms
Why Breeze Doesn’t Include Team Management
Section titled “Why Breeze Doesn’t Include Team Management”Before starting Chapter 08, it’s important to understand why Laravel Breeze (and the React starter kit) doesn’t include built-in team management like Jetstream does.
Breeze Philosophy:
Breeze provides a minimal, opinionated starting point:
- ✓ Authentication (register, login, email verification, password reset)
- ✓ Basic authorization support
- ✗ NOT team/organization management
- ✗ NOT role-based access control
- ✗ NOT two-factor authentication
Why Not Teams?
Different CRM applications have different team models:
- Some use strict team isolation (teams can’t see each other’s data)
- Some allow team-hopping between multiple organizations
- Some support nested teams or hierarchies
- Some use terminology like “workspaces”, “organizations”, or “accounts”
By not including team management, Breeze lets you implement exactly what your CRM needs. This is why Chapter 08 builds teams from scratch-you’ll understand every line of code and can customize it for your specific requirements.
Contrast with Jetstream:
Jetstream (Laravel’s other starter kit) does include teams but is much heavier (30+ files vs Breeze’s minimal scaffold). Jetstream is great if you want everything out of the box, but it’s harder to customize.
For This Series:
We chose Breeze because:
- You’ll build a deeper understanding of multi-tenancy
- You learn exactly how teams integrate with authentication
- You can customize team features for CRM-specific needs
- It shows production patterns used in real apps
In Chapter 08, you’ll implement teams on top of this authentication foundation, and in Chapter 09 you’ll add authorization to keep teams’ data isolated. This mirrors how many SaaS applications are actually built.
Important: Chapter 08 Prerequisites
Section titled “Important: Chapter 08 Prerequisites”Chapter 08 builds directly on this authentication foundation by adding multi-tenancy and team management. Before starting Chapter 08, ensure:
- ✓ You can successfully register, verify email, and log in
- ✓ Dashboard is protected and only accessible when authenticated
- ✓ Password reset flow works end-to-end
- ✓ You understand how Inertia routes work (routes/web.php)
If any of these isn’t working, revisit the troubleshooting sections in this chapter.
Next Steps
Section titled “Next Steps”In future chapters, you’ll:
- [Chapter 08: Multi-Tenancy & User Scopes]: Add team/organization isolation and role-based access control
- [Chapter 09]: Build a team management system for multi-user accounts
- [Chapter 10]: Create a billing system with subscription management
- [Chapter 11]: Add real-time features with WebSockets
Your authentication foundation will remain the same, with these additional layers of functionality built on top.
Your CRM is Now Secure
Section titled “Your CRM is Now Secure”You now have a secure, multi-user CRM foundation. The application knows who each user is, can verify their email, protect their password, and control which pages they can access. This is the core requirement for any serious business application.
From here, you’ll build the features that make your CRM valuable: contact management, deal tracking, team collaboration, and reporting.
Understanding Authentication Middleware
Section titled “Understanding Authentication Middleware”Before moving to Chapter 08, it’s valuable to understand how authentication middleware works. This knowledge will help you implement team middleware later.
Key Middleware in Your Routes:
// This middleware checks if user is authenticatedRoute::middleware('auth')->group(function () {    Route::get('/dashboard', ...)->name('dashboard');    Route::post('/logout', ...)->name('logout');});
// This middleware checks if user is NOT authenticated// Used for login/register pages (prevent logged-in users from accessing them)Route::middleware('guest')->group(function () {    Route::get('/login', ...)->name('login');    Route::get('/register', ...)->name('register');});
// This middleware checks if email is verified// Used alongside 'auth' middlewareRoute::middleware(['auth', 'verified'])->group(function () {    Route::get('/dashboard', ...)->name('dashboard');});
How Auth Middleware Works:
User visits /dashboard ↓Laravel router matches to middleware group ['auth'] ↓'auth' middleware executes: Is user authenticated? ↓If NO → Middleware redirects to /login ↓If YES → Request continues to controllerCommon Middleware Patterns:
// Public routes (anyone can access)Route::get('/', HomeController::class);Route::get('/about', AboutController::class);
// Authenticated routes onlyRoute::middleware('auth')->group(function () {    Route::get('/dashboard', DashboardController::class);    // User must be logged in});
// Guest routes only (can't be logged in)Route::middleware('guest')->group(function () {    Route::get('/login', LoginController::class);    Route::get('/register', RegisterController::class);    // Used to prevent logged-in users from seeing these pages again});
// Authenticated + Email VerifiedRoute::middleware(['auth', 'verified'])->group(function () {    Route::get('/contacts', ContactController::class);    // User must be logged in AND verified email});
// API authentication (uses tokens instead of sessions)Route::middleware('auth:api')->group(function () {    Route::get('/api/users', ApiUserController::class);});
For Chapter 08 (Teams):
You’ll create a team middleware to ensure users can only access their own team:
// Example (you'll implement this in Chapter 08):Route::middleware(['auth', 'verified', 'team'])->group(function () { Route::get('/contacts', ContactController::class); // User must be logged in, verified, AND have access to current team});Middleware Registration:
Breeze automatically registers the built-in middleware. Your custom middleware (like team) will go in app/Http/Middleware/ and be registered in app/Http/Kernel.php.
Further Reading
Section titled “Further Reading”- Laravel Starter Kits - Official starter kit documentation
- Inertia.js - Understanding Inertia’s architecture
- Laravel Fortify - Authentication backend
- React Documentation - Modern React patterns
- TypeScript - TypeScript basics