03: Laravel 12 Fundamentals & Project Structure
Chapter 03: Laravel 12 Fundamentals & Project Structure
Section titled “Chapter 03: Laravel 12 Fundamentals & Project Structure”Overview
Section titled “Overview”Now that your Laravel development environment is running in Docker (from Chapter 02), it’s time to explore what’s actually inside your Laravel application. This chapter introduces Laravel’s directory structure, explains the Model-View-Controller (MVC) architecture, and demonstrates how HTTP requests flow through the framework from browser to response.
In Chapter 02, you created the project structure and started the Docker containers. In Chapter 03, you’ll examine every important directory and understand what each one does. You’ll learn what each file contains, why files are organized this way, and crucially—where your code goes when you build the CRM.
This chapter focuses on fundamentals: routing (how URLs map to code), controllers (where logic lives), views (what users see), and configuration (environment-specific settings). You’ll create simple routes and a basic controller to see how Laravel handles web requests inside your running Docker environment. By understanding the request lifecycle, you’ll know exactly what happens when a user visits a page in your CRM application.
Key context from Chapter 02: You have Sail containers running (laravel.test, mysql, redis, mailhog). When you run commands in this chapter with sail artisan, you’re executing them inside those containers. When you visit http://localhost, you’re hitting your running Laravel app inside Docker. This foundation is crucial before building features.
These fundamentals form the foundation for everything that follows. Master them now, and the rest of the series will feel intuitive.
Prerequisites
Section titled “Prerequisites”Before starting this chapter, you should have:
- ✓ Completed Chapter 02 — This chapter builds directly on Chapter 02. You created the project, installed Sail, and started Docker containers. All of that is required before proceeding.
- ✓ Laravel 12 project (
crm-app) created with Sail configured - ✓ Sail containers currently running — Run
sail up -dif you stopped them after Chapter 02 - ✓ Laravel welcome page accessible at
http://localhost - ✓ Basic understanding of object-oriented PHP (classes, methods, namespaces)
- ✓ A text editor with your project open (VS Code, PhpStorm, etc.)
- ✓ Terminal access with
cdinto yourcrm-appproject directory
Estimated Time: ~45 minutes (including hands-on steps and exercises)
Critical Verification: Run these commands before starting:
# 1. Verify you're in the crm-app directorypwd  # Should show: /path/to/crm-app (or C:\path\to\crm-app on Windows)
# 2. Verify Sail containers are runningsail ps
# You should see 4 containers with "Up" status: laravel.test, mysql, redis, mailhog# If you see "command not found", you're not in the crm-app directory
# 3. Verify Laravel is accessiblecurl http://localhost  # Should return HTML content# Or visit http://localhost in your browser - should show the Laravel welcome page
If any verification fails, go back to Chapter 02 and review the troubleshooting sections.
What You’ll Build
Section titled “What You’ll Build”By the end of this chapter, you will have:
- Deep understanding of Laravel’s directory structure (
app/,routes/,resources/, etc.) — the project Sail created for you in Chapter 02 - Knowledge of the MVC pattern and how Laravel implements it
- Created custom routes in
routes/web.php(inside your running Docker environment) - Generated a controller using Artisan commands (
sail artisan make:controller) - Created a Blade view that renders dynamic HTML
- Understanding of the full request lifecycle: browser request → route → controller → view → response
- Familiarity with essential Artisan commands for code generation
- A working “Hello CRM” page that demonstrates the complete flow from Chapter 02’s Docker setup through request routing
Objectives
Section titled “Objectives”- Navigate Laravel’s project structure confidently
- Understand the purpose of each major directory (
app,routes,resources,config,database) - Create routes using Laravel’s routing syntax
- Generate controllers with Artisan
- Return views from controllers using the
view()helper - Grasp the MVC pattern in Laravel’s context
- Use Artisan commands to generate boilerplate code
- Understand where to place models, controllers, and views
Quick Start
Section titled “Quick Start”Want to see where this chapter takes you? Here’s a 30-second overview of the end state:
# First, verify Docker is still running (from Chapter 02)sail ps  # Shows 4 containers running
# By the end of this chapter, you'll have created:sail artisan make:controller HelloController  # ✓ Generated (inside Docker)# routes/web.php → /hello-crm route          # ✓ Created# resources/views/hello.blade.php             # ✓ Created# Visit http://localhost/hello-crm           # ✓ Working! (served by Docker)
You’ll understand:
- How URLs map to routes
- How routes call controllers
- How controllers render views
- How Blade templates work
Remember: Every sail artisan command and every http://localhost request is executing inside your Docker containers from Chapter 02. This is exactly how Laravel applications work in production.
This foundation applies to every feature you’ll build in the CRM. The MVC pattern you’ll learn is used millions of times daily in Laravel applications worldwide.
Laravel Directory Structure
Section titled “Laravel Directory Structure”When you created your Laravel project with Sail, the installer generated a specific directory structure. Understanding each directory’s purpose is crucial - it tells you where to place models, controllers, views, and configuration files. Here’s a comprehensive breakdown:
Application Code: app/ Directory
Section titled “Application Code: app/ Directory”Your custom application logic lives here. This is where you write code.
| Directory | Purpose | Example Files |
|---|---|---|
Http/Controllers/ | Handle HTTP requests and return responses | ContactController.php, DealController.php |
Http/Middleware/ | Filter and modify requests before reaching controllers | Authenticate.php, VerifyTeamBelongsTo.php |
Models/ | Eloquent ORM classes representing database tables | Contact.php, Deal.php, Company.php |
Providers/ | Bootstrap application services and bind dependencies | AppServiceProvider.php |
Console/Commands/ | Custom Artisan CLI commands | ProcessMonthlyReports.php |
Events/ | Define events that something important happened | ContactCreated.php |
Listeners/ | Handle events when they’re fired | SendContactNotification.php |
Jobs/ | Background jobs for async processing | SendEmailReminder.php |
Exceptions/ | Custom exception classes | TeamAccessDenied.php |
Services/ | Business logic organized by feature (optional) | ContactService.php |
Traits/ | Reusable code shared across multiple classes | HasTeamAccess.php |
Pro Tip: The Models/, Controllers/, and Services/ directories are where you’ll spend most of your time building the CRM.
Routing: routes/ Directory
Section titled “Routing: routes/ Directory”Define all URLs your application responds to:
| File | Purpose | Protection |
|---|---|---|
web.php | Browser-based routes (pages, forms) | ✅ CSRF protection, sessions, cookies |
api.php | API routes for mobile apps, external clients | ❌ Stateless, token-based |
console.php | Scheduled tasks and background jobs | N/A (CLI only) |
channels.php | WebSocket broadcast channels for real-time | N/A (WebSockets only) |
Example usage in this CRM:
web.php—/dashboard,/contacts,/dealsapi.php—/api/contacts,/api/deals(for mobile or external integrations)
Frontend Assets: resources/ Directory
Section titled “Frontend Assets: resources/ Directory”UI code and static assets:
| Directory | Purpose | Compilation |
|---|---|---|
views/ | Blade template files (HTML + PHP) | Compiled server-side |
js/ | React components and JavaScript | Compiled by Vite to public/build/ |
css/ | Tailwind CSS and custom styles | Compiled by Vite to public/build/ |
lang/ | Translation files for multi-language support | Loaded at runtime |
In your CRM: You’ll use js/ for React components (ContactList.tsx, DealBoard.tsx) and css/ for custom Tailwind styles.
Configuration: config/ Directory
Section titled “Configuration: config/ Directory”Settings that change per environment (development, staging, production):
| File | Configures |
|---|---|
app.php | App name, timezone, debug mode |
database.php | MySQL connection details (reads from .env) |
cache.php | Cache driver (Redis, file, etc.) |
queue.php | Background job queue configuration |
mail.php | Email service (SMTP, Mailgun, etc.) |
auth.php | Authentication settings |
session.php | Session storage (cookies, Redis, etc.) |
services.php | Third-party service credentials (Stripe, etc.) |
Important: Configuration values come from .env file. Never hardcode secrets like API keys—use env('STRIPE_KEY') instead.
Database: database/ Directory
Section titled “Database: database/ Directory”Schema versioning and data management:
| Subdirectory | Purpose | Files |
|---|---|---|
migrations/ | SQL schema changes (version-controlled) | 2024_01_15_create_contacts_table.php |
seeders/ | Populate database with initial/test data | ContactSeeder.php, DatabaseSeeder.php |
factories/ | Generate fake data for testing | ContactFactory.php |
In your CRM: You created migrations in Chapter 05 (contacts, companies, deals tables). You’ll create seeders and factories here later for testing.
Runtime Files: storage/ Directory
Section titled “Runtime Files: storage/ Directory”Temporary files generated during application operation:
| Subdirectory | Contains | Example |
|---|---|---|
logs/ | Application error and activity logs | laravel.log |
app/ | Generated files, uploads | User avatars, reports |
framework/ | Cache, compiled views, sessions | Temporary data |
Note: This directory must be writable by your web server. In Docker, Sail handles this automatically.
Tests: tests/ Directory
Section titled “Tests: tests/ Directory”Automated tests ensuring your code works correctly:
| Subdirectory | Type | Purpose |
|---|---|---|
Feature/ | Integration tests | Test full features: “User can create contact” |
Unit/ | Unit tests | Test individual functions: “calculateTotal() works” |
You’ll add tests here in Chapter 31.
Web Root: public/ Directory
Section titled “Web Root: public/ Directory”Everything accessible directly from the browser:
| File/Dir | Purpose |
|---|---|
index.php | Laravel’s entry point—all requests route through here |
build/ | Compiled React + CSS (generated by Vite) |
images/, fonts/ | Static assets (optional) |
Important: This is the only directory users can directly access. Everything else is hidden for security.
Bootstrap: bootstrap/ Directory
Section titled “Bootstrap: bootstrap/ Directory”Framework initialization (rarely modified):
| File | Purpose |
|---|---|
app.php | Initializes Laravel application |
cache/ | Cached framework configuration |
Dependencies: vendor/ Directory
Section titled “Dependencies: vendor/ Directory”Composer packages (auto-installed, never edit):
- Contains all third-party PHP libraries
- Installed via
composer install - Included in
.gitignore(not committed)
Summary: Where You’ll Spend Your Time
Section titled “Summary: Where You’ll Spend Your Time”Most of your CRM development:
app/Models/— Define Contact, Deal, Company modelsapp/Http/Controllers/— Handle /contacts, /deals URLsresources/js/— Build React componentsroutes/web.php— Define which URL goes to which controllerdatabase/migrations/— Structure your database (done in Chapter 05)
Occasional work:
config/— Add configuration when integrating servicesresources/views/— Blade layouts (if not using React)tests/— Write tests for features (Chapter 31)database/seeders/— Populate test data
Rarely modified:
vendor/,bootstrap/,public/index.php— Framework internals
Pro Development Tip: When you don’t know where code should go, ask: “Is this user-facing (routes → controllers)? Data-related (models)? Visual (components)? Business logic (services)?” The directory structure will guide you.
::: tip
Convention Over Configuration: Laravel uses naming conventions to eliminate boilerplate. If you follow these conventions, Laravel automatically finds and loads your files. A controller named ContactController is automatically found in app/Http/Controllers/. A model named Contact is found in app/Models/. This “magic” works through Laravel’s class autoloading.
:::
Key Convention: Application code goes in app/, front-end views in resources/views/, routes in routes/web.php, and configuration in config/. Follow these patterns, and your code will feel like every other Laravel project.
What’s New in Laravel 12
Section titled “What’s New in Laravel 12”Before diving into MVC, it’s worth understanding what Laravel 12 brings to the table. If you’re coming from an earlier Laravel version (or first time with Laravel), here are the key improvements:
Laravel 12 Highlights
Section titled “Laravel 12 Highlights”Performance Improvements:
- ⚡ Faster route caching and compilation
- ⚡ Optimized query execution
- ⚡ Better memory usage
Developer Experience:
- 🎯 Improved error messages with helpful suggestions
- 🎯 Better IDE support and type hints
- 🎯 Simplified configuration for common tasks
Type Safety:
- 📋 Better typed method signatures throughout
- 📋 Stricter validation out of the box
- 📋 Union types in more places
Database & ORM:
- 📊 Improved Eloquent query performance
- 📊 Better relationship loading strategies
- 📊 Enhanced query builder methods
Async & Jobs:
- 🔄 Better queue handling
- 🔄 Improved async processing
- 🔄 Enhanced background job monitoring
Why This Matters for Your CRM:
For your project, you’ll benefit from:
- Better Performance: Your CRM will handle thousands of contacts smoothly
- Type Safety: Fewer bugs due to strict type checking
- Developer Experience: Faster development with better error messages
- Scalability: Built-in optimizations for growing data
You don’t need to know all the details right now. The framework handles most complexity automatically. Just know that Laravel 12 is modern, fast, and designed for production applications like your CRM.
The MVC Pattern in Laravel
Section titled “The MVC Pattern in Laravel”Laravel implements the Model-View-Controller (MVC) architectural pattern. Understanding this pattern is essential because it dictates how to organize your code and how requests flow through your application.
Model — Represents your data and database interactions. In Laravel, models are Eloquent ORM classes that map to database tables:
class Contact extends Model { // Represents the 'contacts' table // Methods for querying: Contact::all(), Contact::find(1), etc.}View — Displays data to the user as HTML. In Laravel, views are Blade template files:
<h1>{{ $title }}</h1><ul> @foreach($contacts as $contact) <li>{{ $contact->name }}</li> @endforeach</ul>Controller — Contains business logic and orchestrates Model and View interactions:
class ContactController { public function index() { $contacts = Contact::all(); // Model $title = 'My Contacts'; return view('contacts.index', compact('contacts', 'title')); // View }}::: tip Controller Response Types While controllers often return views, they can return many things:
// Return a Blade viewreturn view('contacts.index', ['contacts' => $contacts]);
// Return JSON (for APIs)return response()->json(['contacts' => $contacts]);
// Redirect to another routereturn redirect('/contacts');
// Return raw text/HTMLreturn 'Hello, World!';
// Download a filereturn response()->download(storage_path('file.pdf'));
The example above uses view(), but you’ll use all these patterns throughout the series.
:::
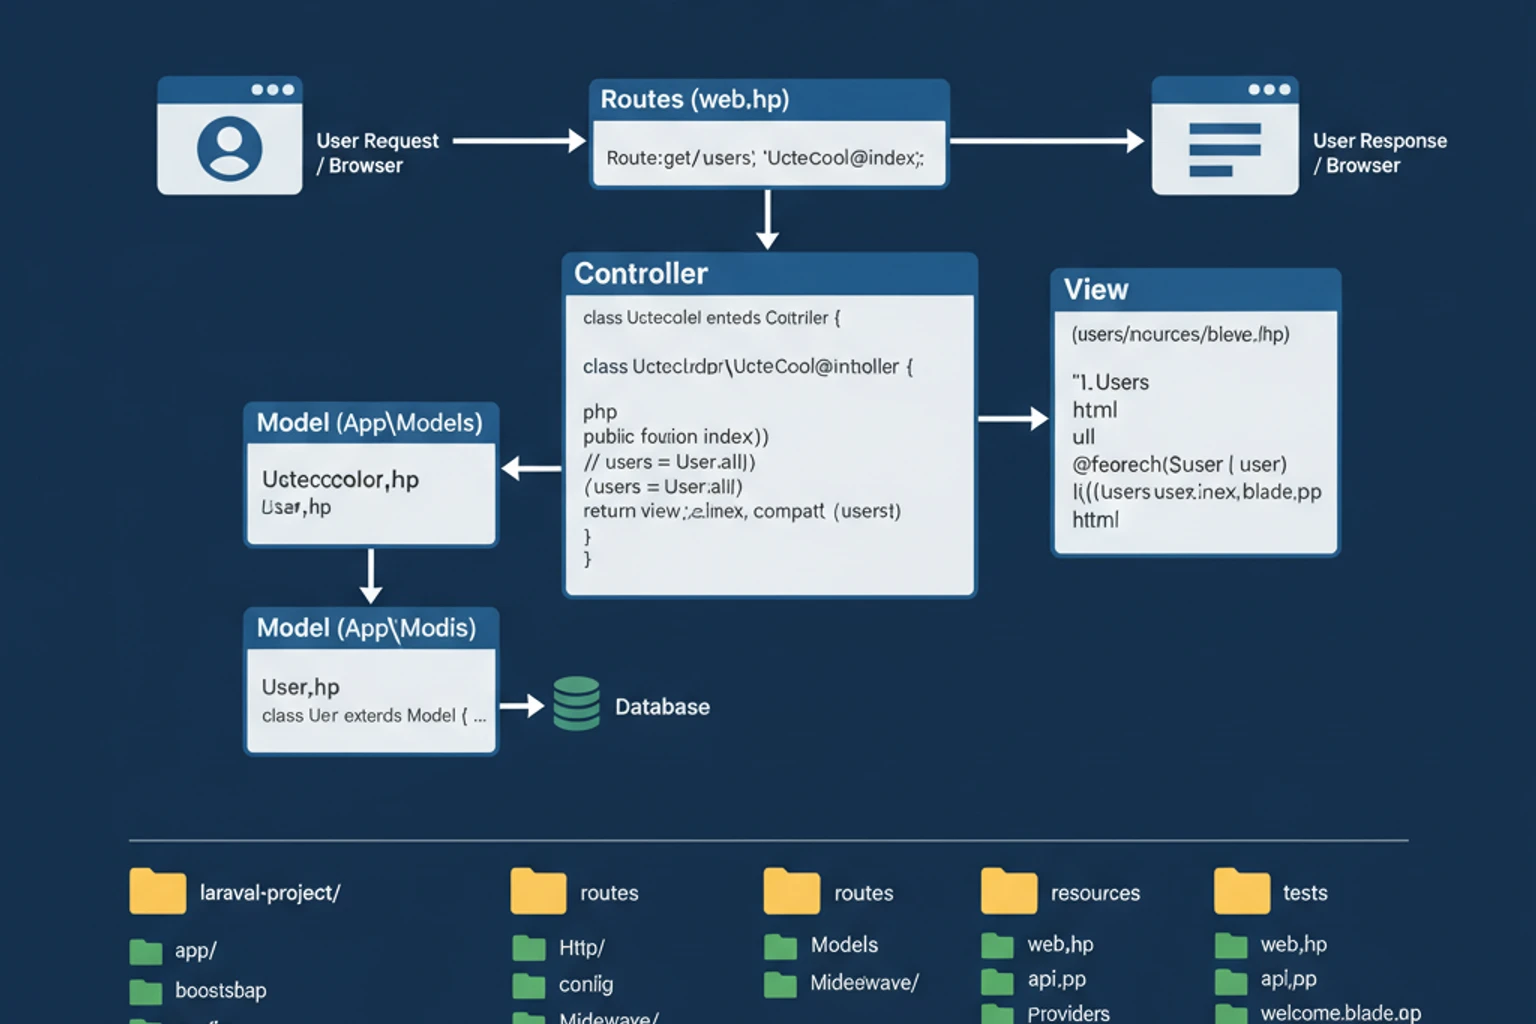
How they work together — Here’s the request lifecycle from browser to response:
- Browser Request — User visits a URL (e.g.,
GET /contacts) - Middleware — Request passes through security layers (CSRF protection, authentication, etc.)
- Route — Laravel router in
web.phpmatches the URL and determines which controller to call - Controller — The controller method (e.g.,
ContactController@index) receives the request - Model — Controller queries the database using Eloquent models (e.g.,
Contact::all()) - Model Returns Data — Database results are returned to the controller
- View — Controller passes data to a Blade template (e.g.,
contacts/index.blade.php) - Response — Rendered HTML is sent back to the browser and displayed to the user
This linear flow ensures a clean separation of concerns at every step.
Laravel extends traditional MVC with several supporting components:
- Middleware — Filters requests before they reach your controller (authentication, CORS, etc.)
- Service Providers — Bootstrap application services and bind dependencies
- Form Requests — Validate user input before controller methods receive data
- Resources — Transform models into API responses
This structure creates separation of concerns: Models handle data, Views handle presentation, Controllers handle logic. When you follow this pattern, your code becomes maintainable, testable, and organized.
::: info Dependency Injection (Laravel Magic)
When you write a controller method like public function index(Request $request), Laravel automatically creates a Request object and passes it to your method. This is called dependency injection—the framework “injects” dependencies your code needs, rather than you creating them yourself.
This works through Laravel’s service container, which acts like a factory for objects. Instead of doing:
public function index() { $request = new Request(); // Manual creation}You let Laravel do it:
public function index(Request $request) { // Laravel passes $request automatically}You’ll see this pattern everywhere in Laravel: Request, Illuminate\Auth\Middleware\Authenticate, UserRepository, and more. The framework resolves these automatically based on type hints. We’ll explore the service container in depth in Chapter 04.
:::
Routing Basics
Section titled “Routing Basics”Routes are the entry points to your application. They map URLs to controller actions or closures. Every request starts with a route - it’s the first thing Laravel checks when someone visits your site.
Route Definition Syntax — Routes are defined in routes/web.php using the Route facade:
Route::get('/path', callback);Route::post('/path', callback);Route::put('/path', callback);Route::patch('/path', callback);Route::delete('/path', callback);HTTP Methods — Each route responds to a specific HTTP method. GET requests retrieve data, POST creates data, PUT/PATCH updates data, DELETE removes data.
Two Types of Routes:
-
Closure-based — Route directly calls a function:
Route::get('/hello', function () {return 'Hello!';}); -
Controller-based — Route calls a controller method:
Route::get('/contacts', [ContactController::class, 'index']);
Route Parameters — Make routes dynamic by capturing URL segments:
Route::get('/users/{id}', [UserController::class, 'show']);// Matches /users/123 and passes 123 to the show() methodNamed Routes — Give routes names for URL generation:
Route::get('/contacts', [ContactController::class, 'index'])->name('contacts.index');
// In your view or controller:<a href="{{ route('contacts.index') }}">View Contacts</a>
Route Groups — Group related routes with common middleware or prefixes:
Route::prefix('admin')->group(function () { Route::get('/dashboard', [AdminController::class, 'dashboard']); Route::get('/users', [AdminController::class, 'users']);});// Creates routes: /admin/dashboard, /admin/usersWeb Routes Protection — Routes in routes/web.php automatically have:
- CSRF Protection — Protection against cross-site request forgery
- Session State — User sessions available via
auth()helper - Cookie Encryption — Automatic cookie encryption/decryption
This is why routes/web.php is for traditional web applications and routes/api.php is for API endpoints (which need different protections).
::: info
Routing in Chapter 04: In this chapter, we’re learning routing basics with simple examples. When we build the actual CRM in Chapter 04+, you’ll use resource routing - a convention that automatically creates all CRUD routes with a single line: Route::resource('contacts', ContactController). For now, master the fundamentals.
:::
Step 1: Create Your First Route (~5 min)
Section titled “Step 1: Create Your First Route (~5 min)”Add a simple route inside your running Laravel application and see how Docker is serving your requests.
Actions
Section titled “Actions”- Verify Sail is running (from Chapter 02):
sail ps# You should see all 4 containers running-
Open
routes/web.phpin your editor. This file is part of the project Sail created in Chapter 02. -
Add a new route after the existing welcome route:
Route::get('/hello', function () { return 'Hello from Laravel!';});-
Save the file. Laravel automatically detects route changes (no restart needed).
-
Visit the route by opening your browser and navigating to
http://localhost/hello
Expected Result
Section titled “Expected Result”Your browser displays:
Hello from Laravel!That’s it! No HTML wrapper, just the raw string. This demonstrates the simplest possible route.
::: tip Verify Your Setup If you don’t see the message, check:
- Sail is running:
sail psshould show 4 containers - No typos in the route path:
/hello(lowercase, no trailing slash) - Browser shows
http://localhost/helloin address bar - No “404 Not Found” error (which means the route wasn’t registered) :::
Why It Works
Section titled “Why It Works”When you visit http://localhost/hello:
- Your browser makes an HTTP GET request to localhost
- Docker port forwarding (configured in Chapter 02) routes this to your PHP container
- Laravel’s router inside the container checks
routes/web.php - It finds the matching
GET /helloroute and calls the closure function - The closure returns the string
"Hello from Laravel!" - Laravel converts that into an HTTP response
- The response travels back through Docker to your browser
- Your browser displays the text
This is the foundation of every web request: URL → Docker Port → Laravel Router → Route → Callback/Controller → Response → Browser.
This is exactly what will happen when you build the CRM. Users will visit routes like /contacts or /deals, and the same flow occurs inside your Docker containers.
Troubleshooting
Section titled “Troubleshooting”-
Error: “404 Not Found” — The route doesn’t exist or isn’t registered. Verify:
- Spelling matches exactly:
/hellonot/Helloor/hello/ - Ensure Sail is running:
sail psshould show containers - Check you edited the correct file:
routes/web.phpin your project root
- Spelling matches exactly:
-
Blank page or error — Check your Sail logs for PHP errors:
Terminal window sail logs laravel.test -
Route doesn’t update — Clear the route cache:
Terminal window sail artisan route:clear
Step 2: Generate a Controller (~10 min)
Section titled “Step 2: Generate a Controller (~10 min)”Use Artisan to generate a controller class and understand its structure.
Actions
Section titled “Actions”- Generate the controller using Artisan inside the Sail container:
# Generate HelloController in app/Http/Controllers/sail artisan make:controller HelloController- Verify the file was created. You should see:
INFO Controller [app/Http/Controllers/HelloController.php] created successfully.- Open the generated file at
app/Http/Controllers/HelloController.phpand examine its structure:
<?php
namespace App\Http\Controllers;
use Illuminate\Http\Request;
class HelloController extends Controller{    //}
The important parts:
- Namespace:
App\Http\Controllers- Tells Laravel where this class lives - Extends Controller: Inherits Laravel’s base controller functionality
- Empty body: Ready for you to add methods
- Add an index method to the controller:
public function index(){ return view('hello');}Your complete controller should look like:
<?php
namespace App\Http\Controllers;
use Illuminate\Http\Request;
class HelloController extends Controller{    public function index()    {        return view('hello');    }}
Expected Result
Section titled “Expected Result”A new controller file exists at app/Http/Controllers/HelloController.php with one index() method that returns a view.
Why It Works
Section titled “Why It Works”Artisan’s make:controller command generates boilerplate code following Laravel conventions. The controller extends the base Controller class, which provides helper methods like view() for returning Blade templates.
The view('hello') helper tells Laravel to find and render the Blade template at resources/views/hello.blade.php. If that file doesn’t exist yet (and it doesn’t!), Laravel will throw an error - we’ll create it in the next step.
The namespace and class name follow Laravel’s PSR-4 autoloading standard. This allows Laravel to automatically find your controller when you reference it in your routes.
Troubleshooting
Section titled “Troubleshooting”-
Error: “Command not found” — Ensure you’re using
sail artisan, not justartisan. Sail runs commands inside Docker containers. -
“Target class [\App\Http\Controllers\HelloController] does not exist” — This error appears when you try to use the controller in a route before the file exists. Make sure the
make:controllercommand completed successfully. -
Namespace errors in editor — Your IDE might complain about the namespace. This is normal - you’re inside a Laravel container. Trust that Laravel’s autoloading handles it.
-
“Controller already exists” — The file exists. Delete it or use
--force:Terminal window sail artisan make:controller HelloController --force
Step 3: Create a Blade View (~10 min)
Section titled “Step 3: Create a Blade View (~10 min)”Create a Blade template file and understand view file organization.
Actions
Section titled “Actions”- Create a new file at
resources/views/hello.blade.php
::: tip
The .blade.php extension is important! Without it, Laravel won’t process Blade syntax.
:::
- Add the following HTML content to the file:
# filename: resources/views/hello.blade.php<!DOCTYPE html><html lang="en"> <head> <meta charset="UTF-8" /> <meta name="viewport" content="width=device-width, initial-scale=1.0" /> <title>Hello CRM</title> <style> body { font-family: system-ui; max-width: 600px; margin: 50px auto; text-align: center; } h1 { color: #2563eb; } p { color: #666; line-height: 1.6; } </style> </head> <body> <h1>Hello CRM!</h1> <p>This is your first Laravel view rendered from a controller.</p> <p><strong>Current Time:</strong> {{ now()->format('Y-m-d H:i:s') }}</p> </body></html>-
Key Blade syntax to notice:
- Blade echo syntax:
now()->format('Y-m-d H:i:s') - It calls PHP’s
now()helper and formats the timestamp - Wrapped in curly braces to automatically escape content for security
- Blade echo syntax:
-
Save the file
Expected Result
Section titled “Expected Result”A new file exists at resources/views/hello.blade.php with HTML and Blade syntax. When this view is rendered, it displays the current date and time.
Why It Works
Section titled “Why It Works”Blade is Laravel’s templating engine. When you call view('hello') from a controller, Laravel:
- Looks in
resources/views/for a file namedhello.blade.php - Compiles the Blade syntax to regular PHP
- Executes the compiled PHP
- Returns the HTML to the browser
Blade’s echo syntax is specific - it outputs escaped HTML (protecting against XSS attacks). Blade provides many helpers:
- Output a variable:
$variable @foreach()— Loop through arrays@if()— Conditional logic- Call PHP functions:
now()
We’ll explore these in future chapters. For now, know that Blade makes templating easier and safer than raw PHP.
Troubleshooting
Section titled “Troubleshooting”-
Error: “View [hello] not found” — The filename or location is wrong. Verify:
- File is at exactly:
resources/views/hello.blade.php - Filename matches the
view('hello')call (no extension needed in the call) - You’re in the correct project directory
- File is at exactly:
-
Raw Blade syntax displayed on page — The file is named
hello.phpinstead ofhello.blade.php. Rename it - the.blade.phpextension is required for Blade compilation. -
PHP error in template — Check syntax in the Blade file. Common issues:
- Unmatched braces in Blade syntax
- Invalid PHP: use variables with
$prefix
-
View displays but formatting looks wrong — CSS not loading? That’s OK for now - we’ll add proper styling in later chapters. The important part is that the view loads.
Step 4: Connect Route, Controller, and View (~10 min)
Section titled “Step 4: Connect Route, Controller, and View (~10 min)”Wire together all three components (route, controller, view) to demonstrate the complete MVC flow.
Actions
Section titled “Actions”- Update
routes/web.phpto use the controller instead of a closure:
<?php
use Illuminate\Support\Facades\Route;use App\Http\Controllers\HelloController;
Route::get('/', function () {    return view('welcome');});
Route::get('/hello-crm', [HelloController::class, 'index']);
Important points:
- Add the
usestatement at the top:use App\Http\Controllers\HelloController; - The route syntax
[HelloController::class, 'index']tells Laravel to call theindex()method - This replaces our closure-based route from Step 1
-
Save the file
-
Open your browser and navigate to
http://localhost/hello-crm -
Observe the full MVC flow:
- Browser requests
/hello-crm - Route matches and calls
HelloController@index - Controller method returns
view('hello') - Laravel finds
resources/views/hello.blade.php - Blade compiles and renders HTML
- Browser displays the “Hello CRM!” page with current timestamp
- Browser requests
Expected Result
Section titled “Expected Result”Your browser displays:
Hello CRM!This is your first Laravel view rendered from a controller.Current Time: 2024-01-15 14:23:45(The time will be your actual current time)
Why It Works
Section titled “Why It Works”This completes the MVC cycle you learned about earlier:
Browser Request ↓Route (/hello-crm) ↓Controller (HelloController::index) ↓View (hello.blade.php) ↓HTML ResponseBy using the controller-based route [HelloController::class, 'index'], you follow Laravel’s conventions. The framework automatically:
- Resolves the controller class from the namespace
- Calls the specified method
- Returns whatever the method returns (in this case, a view)
This pattern scales to complex applications. When you build the CRM dashboard, you’ll follow the same flow - just with more logic in the controller and a more complex view.
Troubleshooting
Section titled “Troubleshooting”-
Error: “Target class [App\Http\Controllers\HelloController] does not exist” — Add the
usestatement at the top ofroutes/web.php:use App\Http\Controllers\HelloController; -
Error: “View [hello] not found” — Verify
resources/views/hello.blade.phpexists and has the.blade.phpextension. -
404 Not Found — Check:
- Route is registered:
sail artisan route:list | grep hello-crm - Sail is running:
sail ps - Route syntax is correct in
routes/web.php
- Route is registered:
-
Blank page or different error — Check Sail logs:
Terminal window sail logs laravel.test -f -
Still seeing old route — Clear the route cache:
Terminal window sail artisan route:clear
Configuration & Environment
Section titled “Configuration & Environment”Laravel applications require different settings for different environments. Your local development machine, a staging server, and production all need different database credentials, API keys, and debug settings. This is where the environment configuration system comes in.
The .env File — This file stores environment-specific values:
APP_NAME="CRM App"APP_DEBUG=trueAPP_URL=http://localhost
DB_CONNECTION=mysqlDB_HOST=mysqlDB_PORT=3306DB_DATABASE=crm_appDB_USERNAME=sailDB_PASSWORD=password
MAIL_MAILER=log
Key points:
.envis gitignored (never committed to version control) because it contains secrets- Never hard-code credentials in your code - use
.envinstead - Each developer/environment has their own
.envfile with their own credentials
Configuration Files — The config/ directory contains PHP files that read from .env:
return [ 'name' => env('APP_NAME', 'Laravel'), 'debug' => env('APP_DEBUG', false), 'url' => env('APP_URL', 'http://localhost'),];Accessing Configuration — Use the config() helper in your application:
$appName = config('app.name'); // 'CRM App'$debugMode = config('app.debug'); // true$databaseHost = config('database.default'); // 'mysql'Best Practice: Use config() in your code, never env() directly. Config files live in source code; .env lives only on each machine. This separation keeps code safe and portable.
Environment-Specific Behavior — With configuration, you can easily adjust application behavior:
if (config('app.debug')) { // Show detailed error messages (development only!)} else { // Show generic errors (production)}In Chapter 02, Sail automatically created your .env file from .env.example. This is the standard Laravel pattern - .env.example is committed with template values so new developers know what environment variables are needed.
::: warning
Never commit .env to Git! It contains database passwords and API keys. If you accidentally commit it, immediately rotate all credentials. Always use .env.example as your template instead.
:::
Artisan Command Reference
Section titled “Artisan Command Reference”Artisan is Laravel’s command-line interface. You’ve already used it to generate a controller. Here’s a quick reference of essential commands you’ll use regularly:
Code Generation Commands:
| Command | Purpose |
|---|---|
sail artisan make:controller NameController | Generate a controller class |
sail artisan make:model ContactModel | Generate an Eloquent model |
sail artisan make:migration create_contacts_table | Generate a database migration |
sail artisan make:request StoreContactRequest | Generate a form request validator |
sail artisan make:middleware CheckPermission | Generate middleware class |
sail artisan make:job ProcessContactImport | Generate a queued job |
Database Commands:
| Command | Purpose |
|---|---|
sail artisan migrate | Run all pending database migrations |
sail artisan migrate:rollback | Rollback the last batch of migrations |
sail artisan seed | Seed the database with test data |
sail artisan db:seed --seeder=ContactSeeder | Run a specific seeder |
Development Commands:
| Command | Purpose |
|---|---|
sail artisan serve | Start the development server (not needed with Sail) |
sail artisan tinker | Interactive PHP REPL for testing code |
sail artisan route:list | Display all registered routes |
sail artisan route:clear | Clear the route cache |
sail artisan config:clear | Clear the configuration cache |
sail artisan cache:clear | Clear all application caches |
Useful Flags:
# Get help for any commandsail artisan make:controller --help
# Force overwrite if file existssail artisan make:controller HelloController --force
# Generate model with migration and factorysail artisan make:model Contact -m -f# -m = create migration, -f = create factory
Pro Tip: Run sail artisan list to see all available commands. Run sail artisan help commandname for detailed information about any command.
# View all available commandssail artisan list
# Get detailed helpsail artisan help make:controller
In the next chapters, you’ll use these commands frequently to scaffold your CRM application’s models, controllers, and migrations.
Exercises
Section titled “Exercises”Exercise 1: Create an About Page
Section titled “Exercise 1: Create an About Page”Goal: Practice the route → controller → view workflow independently
Create your own about page to reinforce what you’ve learned. You’ll need:
- A new route
/aboutinroutes/web.php - A new
AboutControllergenerated with Artisan - A new
about.blade.phpview
The controller should return the view, and the view should display:
- A heading “About This CRM Project”
- 2-3 paragraphs describing the project’s purpose
- A link back to the home page
Validation: Visit http://localhost/about and see your custom page. The page displays, has the heading, paragraphs, and the link works.
Hints:
- Use
sail artisan make:controller AboutControllerto generate - Create route:
Route::get('/about', [AboutController::class, 'index']) - Create view at
resources/views/about.blade.php - Add import at top of routes file:
use App\Http\Controllers\AboutController;
Exercise 2: Explore Artisan Discovery
Section titled “Exercise 2: Explore Artisan Discovery”Goal: Get comfortable with Artisan’s help system
Artisan can tell you about itself! Run these commands in your Sail terminal:
# See all available commandssail artisan list
# View the output and find: make:*, route:*, config:*, cache:*
# Get help for a specific commandsail artisan make:controller --help
# Check what routes are currently registeredsail artisan route:listValidation: After running these commands, you can explain what make:controller --help shows and identify all your registered routes (including /hello-crm and /about).
Learning Point: These commands are your documentation. Instead of memorizing syntax, learn how to explore Artisan’s built-in help.
Exercise 3: Create a Route with Parameters
Section titled “Exercise 3: Create a Route with Parameters”Goal: Learn dynamic route parameters
Create a route that accepts a parameter and uses it in the response:
Route::get('/greet/{name}', function ($name) { return view('greet', ['name' => $name]);});Then create resources/views/greet.blade.php:
<!DOCTYPE html><html> <head> <title>Greeting</title> </head> <body> <h1>Hello, {{ $name }}!</h1> <p>Welcome to the CRM application.</p> </body></html>Validation:
- Visit
/greet/Aliceand see “Hello, Alice!” - Visit
/greet/Boband see “Hello, Bob!” - Visit
/greet/Sarahand see “Hello, Sarah!”
The route parameter {name} is passed to the view as a variable $name. This pattern is fundamental to building dynamic pages.
Extension Challenge: Create a route /users/{id} that displays user information. If the user ID is less than 10, show a special message. (Hint: Use @if in Blade or if in the closure)
Wrap-up
Section titled “Wrap-up”Congratulations! You’ve mastered Laravel’s fundamental architecture. Let’s review what you’ve accomplished:
What You’ve Built:
- ✓ Explored Laravel’s directory structure and understand where every type of file belongs
- ✓ Created routes that map URLs to application logic
- ✓ Generated controllers using Artisan that handle business logic
- ✓ Built Blade views that render dynamic HTML
- ✓ Connected all three MVC components in a working application
- ✓ Learned how configuration and environment variables work
- ✓ Mastered key Artisan commands for code generation
Key Concepts You Now Understand:
- MVC Architecture: Requests flow through routes to controllers, which interact with models and return views
- Laravel Conventions: The framework automatically finds your code when you follow naming conventions
- Blade Templating: You can safely output data with Blade’s echo syntax and use logic like
@foreachand@if - Configuration System: Environment-specific settings keep your code safe and portable
- Artisan CLI: The command-line tool automates code generation and common tasks
Why This Matters:
These fundamentals aren’t just theory - they’re the patterns you’ll use in every feature you build. Whether you’re creating a contacts page, a company dashboard, or a deal pipeline, you’ll always follow the route → controller → view flow. Master these patterns now, and the rest of the series will feel intuitive.
What’s Next:
In Chapter 04: Database Design & Eloquent Models, we’ll stop building temporary examples and start building the real CRM application. You’ll:
- Design the database schema for contacts, companies, and deals
- Create Eloquent models that interact with the MySQL database running in Docker (from Chapter 02)
- Learn how models represent your application’s core data
- Build queries that fetch and manipulate data
- Understand relationships (one-to-many, many-to-many, etc.)
Key reminder: You now understand the complete request flow:
- Chapter 02 set up your Docker environment with PHP, MySQL, Redis, and Mailhog running
- Chapter 03 showed you how to create routes and controllers that handle requests
- Chapter 04 will teach you how to interact with the database layer inside those containers
The “Hello CRM” example you built in this chapter is your foundation. The controllers, views, and routes you created follow the same patterns you’ll use for real CRM features. Combined with Docker containers from Chapter 02, you have everything needed to build a production-grade application.
You’re ready to move forward. Your environment is running. Your project structure is understood. Now let’s add data.
Before Moving to Chapter 04:
- Complete all three exercises above
- Visit
http://localhost/hello-crmand verify it works - Run
sail artisan route:listand see all your routes - Try modifying the Blade view - change the text, add more content
- Experiment: Create a new simple route and view on your own
You’ve proven you understand Laravel’s fundamentals. You’re ready for databases and models. Let’s build the real CRM.
Further Reading
Section titled “Further Reading”- Laravel Directory Structure - Official structure guide
- Laravel Routing - Complete routing documentation
- Laravel Controllers - Controller patterns and best practices
- Blade Templates - Template engine reference
- Artisan Console - Command-line tool documentation